Author Topic: 3D Printed Phase II Jesse  (Read 884 times)

Offline DisasterDom

  • Posts: 6
    • Awards
    • Awards
    • Awards
  • Real Name: Dominick White
3D Printed Phase II Jesse
« on: September 20, 2022, 03:06:35 PM »
Using Galactic Armory's files in PETG, I'll be starting my Phase II Jesse build. Who knew that the trick to being motivated was to buy a massive 5kg roll of filament.

So far I have the helmet a decent way done, plus the raw prints of the shoulders, biceps, forearms, and handplates. As I type this, my printer is working on printing the cod, split into two halves. Due to my size (5'1" at around 160lbs), the armor has to be very meticulously re-scaled in Armorsmith Designer. Unfortunately, simply downing percentages wasn't enough to get things to my size, particularly with the forearms, as Galactic Armory presumably has larger forearms than me, so I had to use free-form deformation in order to get the parts to wrap a little more snugly to my size.

While I am trying to measure twice, print once, I am trying to keep an open mind if parts are not perfectly the size they need to be in order to look correct, and am prepared to reprint parts if need be. I'll get a picture soon of how everything on the arms fit to confirm their proportions/fit here.


The helmet is coming along well and I'm just about ready to paint the secondary colors and helmet pattern on it, but I figured I'd show how it's looking at it's current stage. Aerators are being worked on separately.


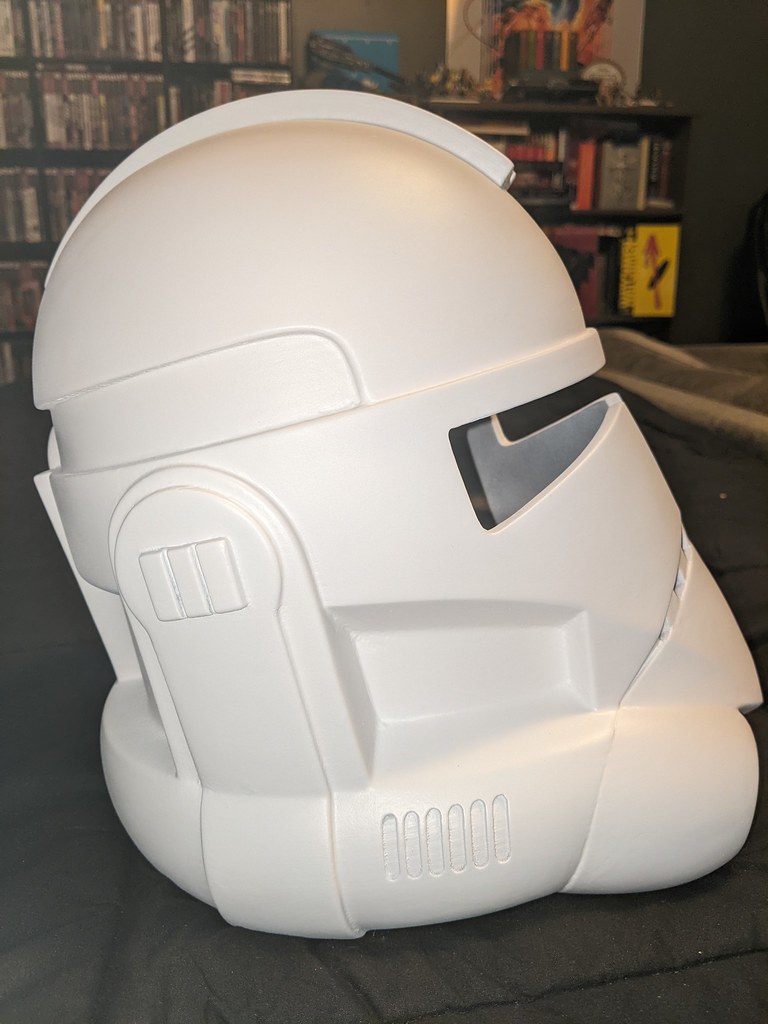
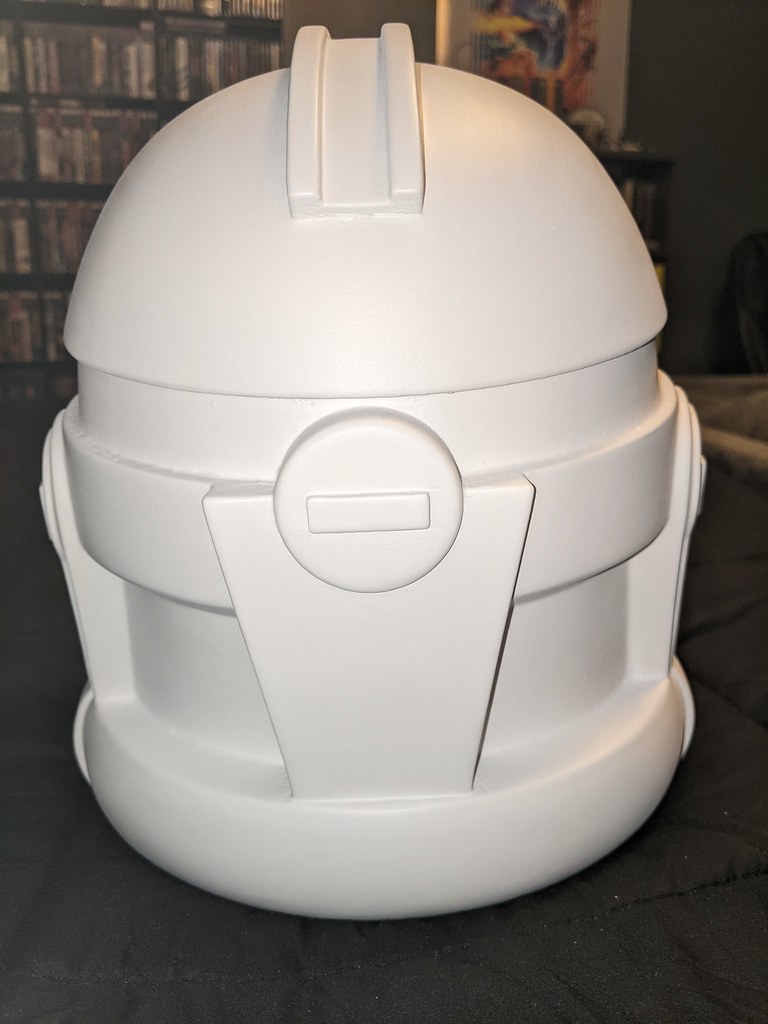
If everything looks good, I think it just needs a quick round of a wet sand before I get it ready found the blue and the grey design next. I have some of my Krylon Gloss True Blue leftover from a leftover project, but I'm currently undecided on A, which grey I should use, and B, if I should handpaint the Republic symbol, or spray paint it in.


Finally, I'm curious about these gloves I have. They're a pair of "Rogue One Trooper Gloves" from Endor Finders that I bought for an old Shoretrooper build. They're a really nice pair of gloves, but I'm not sure if they are maybe too over-designed, let's say, for an animated clone trooper? These technically match the requirements listed on the CRL, but the gloves shown there seem to be a bit simpler in terms of their design. Think they'd work? If so, I feel I can easily just work on finishing the handplates while some more of the armor prints. Here's a better idea of how the handplates loosely fit. Should there be much overhang in that space between the thumb and pointer finger?

  • Like

Offline CJ49er

Re: 3D Printed Phase II Jesse
« Reply #1 on: September 20, 2022, 06:28:46 PM »
Welcome to the forums!

I am sure our resident clone experts can chime in regarding your questions.  I am working on a clone also, but I still seek their advice myself :P

Look forward to seeing your progress!

  • Like
SL/TI/TK/DS/BH 12770

Offline Jeffnmar

Re: 3D Printed Phase II Jesse
« Reply #2 on: September 20, 2022, 06:32:13 PM »
WOW , looking good trooper.  I couldn't tell by the pictures but is that print before you sanded and primed everything , very nice!!! Cant wait to see the final version...
  • Like

Offline DisasterDom

  • Posts: 6
    • Awards
    • Awards
    • Awards
  • Real Name: Dominick White
Re: 3D Printed Phase II Jesse
« Reply #3 on: September 20, 2022, 06:49:14 PM »
Thank you both! The helmet so far is the only thing that has been fully "finished" in terms of removing the print lines. It's probably a little difficult to tell in the pictures here, but everything else is still just raw prints. The only other parts that are sanded at all are just the handplates. I wanted to make sure everything was looking good on the scaling front before I finished them in case they need to be reprinted.

Here's a rough look at how everything on the arms fit.


Since the other arms parts are the exact same, and being that none of this is properly strapped onto anything yet, I figured one arm will have to do for now. The shoulder wants to just fall right off if I'm not holding it in place. Happy to get a picture with better angles if need be.
  • Like

Offline Nathanzx10r

  • Cloud City Admin
  • Posts: 344
  • GML
    • Awards
    • Awards
    • Awards
Re: 3D Printed Phase II Jesse
« Reply #4 on: September 20, 2022, 07:19:15 PM »
Welcome...

I also print in PETG, finishing is usually a little easier then PLA in my experience, so thats a added bonus too. One thing I do to help speed up the finishing process is after my 1st inital sanding, I apply table top resin over my prints. Pretty conservative on the outside making sure there are no spots pooling during curing process.  I also add a very liberal amount on the inside of my prints and that helps build up strength for the parts. Then finishing is pretty easy to do as all the print lines are no more.

Here is a prep'd and ready to paint Vader helmet using that method. Side by side with my fiberglass helmets, you can't even tell it was 3D printed.


« Last Edit: September 20, 2022, 07:22:26 PM by Nathanzx10r »
  • Like
Scout Trooper / RO-Tie Pilot / Tusken Raider

Offline 1nfern0

Re: 3D Printed Phase II Jesse
« Reply #5 on: September 21, 2022, 02:42:05 PM »
Clones!!! Welcome! I can’t wait to see this build progress! I’ve debated working on a Jesse too off and on because it’s such a cool looking armor.

I usually do a coat of Bondo Glazing putty where needed, followed by a couple of coats of filler primer to smooth out my prints, but Nathan’s resin method sounds much more durable. I’m excited what ends up working for you.
  • Like
CC/TK/DZ/ID/TI/TR-44214

IN in progress… TB in progress...

“Close the blast doors! Open the blast doors!”

Offline DisasterDom

  • Posts: 6
    • Awards
    • Awards
    • Awards
  • Real Name: Dominick White
Re: 3D Printed Phase II Jesse
« Reply #6 on: September 21, 2022, 04:09:45 PM »
I've done work with both the glazing and spot putty, filler primer and the resin methods before and they each have their pros and cons! All three could easily be used in tandem, I've found.

Nathan, I've stared at those three helmets for a good while and you're right, I couldn't tell which was the 3D printed one even if you told me.

Unfortunately the cod piece print needs to be reset as the printer has decided to be temperamental, plus we have some guests staying with us for the next few days in the same room where I keep my printer, so updates may be slow for the remainder of the week. But I will work on other parts where I can.
  • Like

Offline NavySith

Re: 3D Printed Phase II Jesse
« Reply #7 on: September 22, 2022, 11:21:42 PM »
Clones!!!!
Everything is looking good so far. Gloves should be fine. Look forward to the build progress.


Sent from my iPhone using Tapatalk
  • Like


Scott
CT/SL/TK/AR-6754

Offline Nathanzx10r

  • Cloud City Admin
  • Posts: 344
  • GML
    • Awards
    • Awards
    • Awards
Re: 3D Printed Phase II Jesse
« Reply #8 on: September 24, 2022, 12:09:05 PM »
I am working on these Vader chest boxes this week, so snapped a couple pictures of the process I use.

1. Print parts.


2. Give parts a quick sanding using a electric sander (5 mins each is good, just wanna knock down any blobs or print issues).


3. Mix and apply epoxy (In this case I am actually filling in those countersunk areas, so I didn't have to be careful of them).


4. After ample cure time, sand with electric sander and 80 grit paper.


At this time I could probably start primer, but I generally like to give it another sanding with 150 grit by hand then apply filler primer and prep for paint.  I have had good result with this process. You just have to keep a close eye making sure not to pool up epoxy in areas with details you want to keep.

Here is a box I finished using the same method.


« Last Edit: September 24, 2022, 12:23:01 PM by Nathanzx10r »
  • Like
Scout Trooper / RO-Tie Pilot / Tusken Raider

Offline 1nfern0

Re: 3D Printed Phase II Jesse
« Reply #9 on: September 24, 2022, 08:49:43 PM »
Wow, that looks good Nathan! I bought some epoxy resin today to try it. How do you manage it fine detailed bits?
  • Like
CC/TK/DZ/ID/TI/TR-44214

IN in progress… TB in progress...

“Close the blast doors! Open the blast doors!”

Offline Nathanzx10r

  • Cloud City Admin
  • Posts: 344
  • GML
    • Awards
    • Awards
    • Awards
Re: 3D Printed Phase II Jesse
« Reply #10 on: September 24, 2022, 10:41:26 PM »
Its just the box and switches that are 3D printed, the other parts are CNC machined and the light switches are cast resin. If any project I am doing requires small detailed parts, I have my buddy knock them out on his resin 3D printer for me. FDM printers and small detailed parts usually do not turn out so good.
« Last Edit: September 24, 2022, 10:52:00 PM by Nathanzx10r »
  • Like
Scout Trooper / RO-Tie Pilot / Tusken Raider

Offline 1nfern0

Re: 3D Printed Phase II Jesse
« Reply #11 on: September 25, 2022, 12:14:12 PM »
Ah, fair enough!
  • Like
CC/TK/DZ/ID/TI/TR-44214

IN in progress… TB in progress...

“Close the blast doors! Open the blast doors!”

Offline DisasterDom

  • Posts: 6
    • Awards
    • Awards
    • Awards
  • Real Name: Dominick White
Re: 3D Printed Phase II Jesse
« Reply #12 on: February 12, 2023, 09:24:36 PM »
After a bit of a hiatus due to some technical issues my 3D printer was having, I think I am ready to get back to work on this. While I wait to order a new roll of PETG to work on the armor itself, I have the printer going on some PLA+ to work on my DC-15S. I know it's optional, but it will keep my printer and I busy while I wait on the new filament.

While the parts to that are printing, I want to finally finish my bucket off. However I saw a thread over on the CTD forum that implied that while Krylon Gloss True Blue would work for a realistic 501st clone, it wouldn't for an animated clone. I just wanted to confirm whether or not this is true? I couldn't find anything on the forum that seemed to indicate otherwise or that some paints are approvable for either realistic/animated but not the other. I have a can of Krylon Gloss True Blue leftover from another project, and if I can use it for this, that would be great, but I'll definitely need to figure it out before I get back to painting.

EDIT: "Bit of a hiatus" lol I just realized I haven't updated this thread since September. Whoops!
« Last Edit: February 12, 2023, 09:41:20 PM by DisasterDom »
  • Like

Offline DisasterDom

  • Posts: 6
    • Awards
    • Awards
    • Awards
  • Real Name: Dominick White
Re: 3D Printed Phase II Jesse
« Reply #13 on: February 18, 2023, 12:00:42 PM »
Been working on the paintjob for the helmet. Here's my current progress.


I need to knock more of the gloss down and touch up a few spots, but it's coming along. The back has been painted as well, save for the indented band along the back of the dome. Since the CRL says it is a slightly darker shade of blue, I need to figure out how I am going to accomplish that. I am otherwise ready to tackle the Republic insignia on the front. I've had pretty good luck free-handing helmet designs before, so I think if I take it slow, it should be fine.
  • Like

Offline DisasterDom

  • Posts: 6
    • Awards
    • Awards
    • Awards
  • Real Name: Dominick White
Re: 3D Printed Phase II Jesse
« Reply #14 on: February 22, 2023, 06:57:34 PM »
The indented band has been painted in with Rustoleum Navy Blue. I have attempted to freehand a rough draft of the Republic insignia with pencil onto the bucket, which was harder than I anticipated, but it's done at least. The reference pictures I have seem to indicate that the insignia was likely hand painted regardless, as it does not seem perfectly even or proportionate in canon, so I assume not having it look perfect is more or less in line with canon. Here's the draft:


The second image is just to show the gaps between the lines on the sides better.

In other news, I recently purchased a filament dehydrator, since wet PETG is most likely the reason I was having so many issues with my prints, so hopefully now I can get back to printing more pieces of the armor again. I think I may re-print my biceps as well, as I've been experiencing some pinching and I think they may just be a hair too tight on my arms, but that's a pretty easy fix since biceps aren't terribly complicated prints.
  • Like

Tags: