Author Topic: Mike's Cad Bane  (Read 28183 times)

Offline CadBane3

Re: Mike's Cad Bane
« Reply #120 on: March 21, 2018, 07:21:18 AM »
EPIC! We seeing Cad this weekend on the coast?

Yeah, I'll be down Sunday and am thinking about wearing a hybrid of what I have approved with the new mask and hat. Will try it all on this week to ensure it would work and if not, I'll wear the old stuff. Should be fun!
  • Like
Mike
TK/TB/BH/DS/DZ-42125

Offline CadBane3

Re: Mike's Cad Bane
« Reply #121 on: March 21, 2018, 03:51:02 PM »
Very small update today but I feel like I may have turned a corner and these gauntlets are starting to look like they are supposed to look!

I started with cutting out the part of the gauntlet where the dart sloped area will be:

20180319_135758 by Michael Halstead, on Flickr

Then, I built a paper model of what the lower forearm section will look like. I find it is much more cost efficient to make these parts out of paper and then flatten the paper onto my ABS for cutting. It helps eliminate some mistakes. Some, but not all.

20180319_141009 by Michael Halstead, on Flickr

Here's a bad pic of the reference material I am using and a view of what I am trying to achieve:

20180319_141033 by Michael Halstead, on Flickr

Then, I used my template to cut the ABS. At this point, I always cut it quite a bit larger than I think I would need. Much easier to remove extra ABS than to add back to it later.

20180321_133935 by Michael Halstead, on Flickr

Then, I started heating and shaping the ABS:

20180319_142627 by Michael Halstead, on Flickr

Test fit before more cutting:

20180319_143008 by Michael Halstead, on Flickr

And then melted the sloped area where the gauntlet darts will go:

20180319_145406 by Michael Halstead, on Flickr

And repeat for the twin:

20180321_140545 by Michael Halstead, on Flickr

Then I searched high and low in my house for something that will work for the final piece of the gauntlet darts. Not since I was a young boy have I been so excited to find a stick!!!

20180321_142505 by Michael Halstead, on Flickr

I sanded one end so it is sloped and then used my dremel on the back end so that it would fit on the gauntlet:

20180321_144613 by Michael Halstead, on Flickr

Here's that reference pic again and the darts that I ended up with. Once I removed a bit of the extra metal rod, they were very accurate, in my opinion:

20180321_150524 by Michael Halstead, on Flickr

I shortened the metal part of the darts slightly and then epoxied them into the wood and epoxied the wood to the plastic gauntlet.

20180321_150945 by Michael Halstead, on Flickr

Then to be safe, I drilled a screw into the back of them as an added precaution to keep them in place:

20180321_150953 by Michael Halstead, on Flickr

And here's the general idea.

20180321_153559 by Michael Halstead, on Flickr

The forearm pieces aren't attached yet as I have had some inspiration and ideas of what to do with them, but I'm constantly waiting on parts now. I'll probably start thinking about the upper hydraulic attachment point while those other parts are in the mail. They are getting pretty close to being done though, so that's a positive. Few things to figure out still.

I guess I should start thinking about how I'm going to separate my duster from the light jacket. Rather than potentially ruin what I have, and, *gasp*, not be able to troop as Cad, I've been thinking that buying a new duster/jacket set up may be the way to go. I dunno. I put an awful lot of work into the one I have and that would all need to be repeated. My concern is that in separating the two, I may damage them and then I'm back to square one. To buy anew is expensive and requires a lot of work. I guess, either way, there will be work to do. It's probably more of a matter of how much more in expenses I can stomach in this build...
  • Like
Mike
TK/TB/BH/DS/DZ-42125

Offline CadBane3

Re: Mike's Cad Bane
« Reply #122 on: March 27, 2018, 04:03:57 PM »
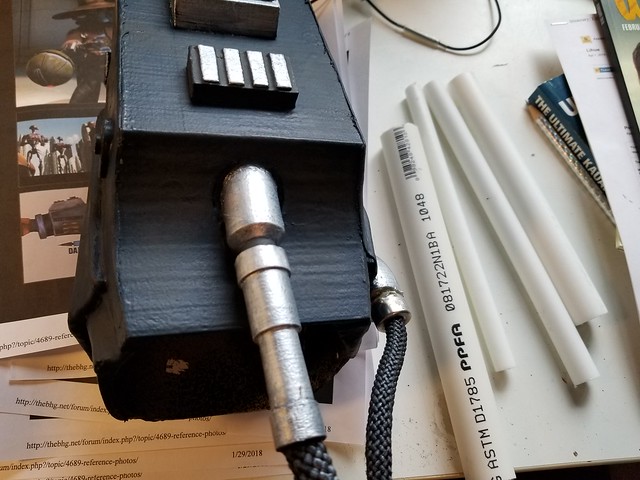
Good afternoon all! Gauntlet progress and I'm happy to start to see the light at the end of the gauntlet tunnel. I was racking my brain for a way to make the upper hydraulic connector and finally just decided to buy all sorts of PCV pipe and see what I could come up with. I need about 6-7 inches, so of course, I had to buy roughly 15 feet! So, I cut it down and started with this:

20180322_100844 by Michael Halstead, on Flickr

Here is about what I was going for:

20180322_101108 by Michael Halstead, on Flickr

So, I started fitting pipe into pipe and cutting it down to where I felt it would be the right size:

20180322_105117 by Michael Halstead, on Flickr

and ended up with these:

20180322_111828 by Michael Halstead, on Flickr

Once they were shaved to the right angle and epoxied on, they looked like this. Pretty close to what I wanted:

20180323_111436 by Michael Halstead, on Flickr

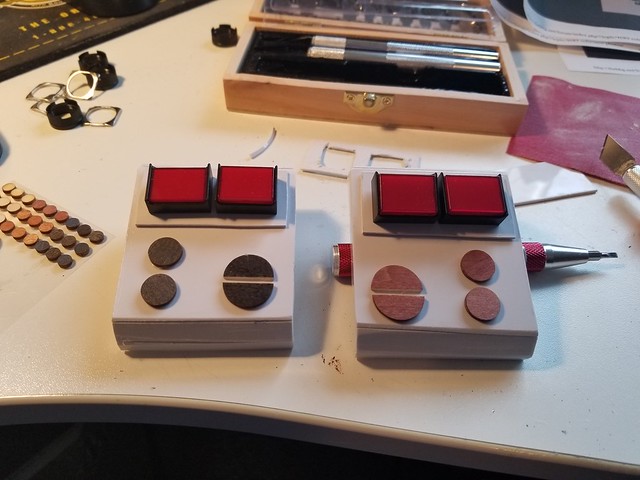
Then, I started brainstorming how I'm going to get light up buttons on the top of the gauntlet. I bought these off ebay because they looked like they would work:

20180323_144251 by Michael Halstead, on Flickr

And got to cutting out a spot for them to go:

20180323_153448 by Michael Halstead, on Flickr

And the gauntlet tops will look roughly like this:

20180323_162051 by Michael Halstead, on Flickr

I was worried they would protrude into my forearm but got real lucky once I cut through the whole gauntlet and they will not!

20180326_140511 by Michael Halstead, on Flickr

So, they'll look roughly like this:

20180326_142500 by Michael Halstead, on Flickr

This is the part where I need help. I don't know anything about wiring them up to make them work. Here are pictures of the sides and bottom. Can anybody help educate me on what I would need for a battery supply in each gauntlet to make them work? I tore apart a cheap light set from Craft Warehouse and stripped the wires and attached them but that illuminated them at all times (very faintly as it was off 2 AA batteries) and the push button part didn't make a difference (not off when up or on when down but constantly on). I'm sure I'm just doing something wrong, but would love for them to be able to be run off a few AA batteries (upwards of 4 or whatever is needed) that I could stash in each gauntlet or even 9V, but again, my knowledge on this stuff is zero at best. Anybody, feel free to chime in. Brews on me if you want to help! The letters on the bottom are +, -, NO, NC, and C.

20180323_164227 by Michael Halstead, on Flickr

20180323_164237 by Michael Halstead, on Flickr

20180323_164239 by Michael Halstead, on Flickr

Anyway, back to the action!

Took a break to troop with what I had so far and it was a breath of fresh air and additional motivation to keep pushing through!

20180325_115942 by Michael Halstead, on Flickr

So, I epoxied the gauntlet dart assembly (bottom piece) to the rest.

20180327_105357 by Michael Halstead, on Flickr

And then I sanded down all the rough edges and started to add craft foam to the bottom where the gauntlet has a raised surface.

20180327_112554 by Michael Halstead, on Flickr

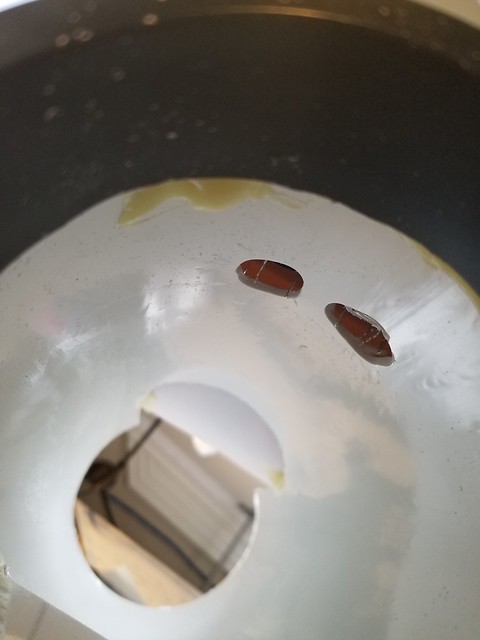
Then, I need to add the inner hydraulic insertion point. All along, I've thought the shape of this looks like half an egg. Had a real hard time finding a part at the hardware store that would work for this, so I ebayed for plastic eggs. Evidently, magicians use plastic eggs in their magic tricks, so I picked these up at the local magic store:

20180320_152758 by Michael Halstead, on Flickr

And now I have two inner hydraulic connectors!
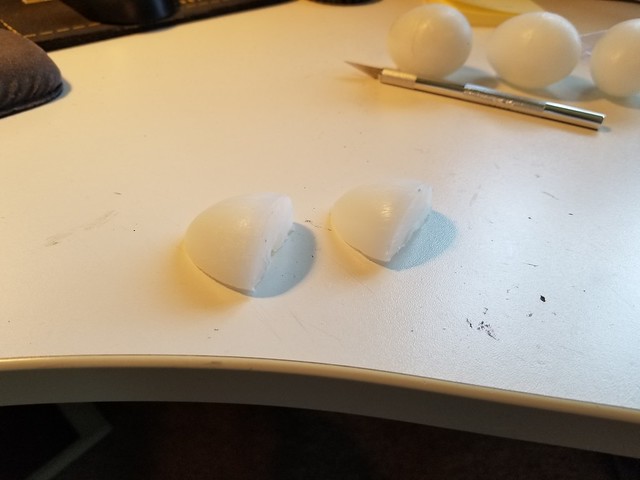
20180320_154429 by Michael Halstead, on Flickr

So, I got them epoxied on:

20180327_150956 by Michael Halstead, on Flickr

Then, I was looking for some parts that were round and large enough to be the outer gauntlet trim detail. While searching, I knocked over a vintage stormtrooper that was on a plastic stand, so once again, providence shone upon me and I had found a part that would work perfectly. So, I added one action figure stand to each gauntlet!

20180327_152234 by Michael Halstead, on Flickr

I still need to add the electroshock emitters but my wife used all of her eyeshadow brushes so I couldn't sneak 12 of them like I did before. Doesn't she know I have needs!?!?!?! So, I've ordered some from ebay and will see about adding them when they get here. Remaining items are to add the electroshock emitters, mod podge the foam, figure out the wiring, secure the gauntlet button top pieces (they are loose right now so I can wire them), prime and paint. Once that's done, I can add the hydraulics and I believe I have just enough rope left over from what Nightshine sent me to make it work. I may add a closing trim piece to the back, elbow, area of the gauntlets as they look a bit rough right now, but that part will never be seen, so it's purely cosmetic. But still, if I'm going to go this far, the may as well be perfect.

So, here they are so far!

20180327_152518 by Michael Halstead, on Flickr

20180327_152527 by Michael Halstead, on Flickr

20180327_152538 by Michael Halstead, on Flickr
  • Like
Mike
TK/TB/BH/DS/DZ-42125

Offline CadBane3

Re: Mike's Cad Bane
« Reply #123 on: April 13, 2018, 12:00:57 PM »
Hey all! Miss me? Took a vacation and have been a bit busy, but I have a very small, but very important update to share. Still working on the gauntlets and progress has slowed to a halt while I wait for eyeshadow brushes to come from China. My wife used all the rest of the pack that I had stolen them out of and now I can't find the same design. The ones I ordered are obviously being transported by row boat, so I'm not sure if I'll ever see them. I only need 12 of the suckers, so if any of you ladies (or fellas) want to help a brother out and send a few my way, I'd be eternally grateful. They are the best piece I have found to be the electroshock emitters on the sides of the gauntlet. They look like this:

20171223_150944 by Michael Halstead, on Flickr

20180209_145838 by Michael Halstead, on Flickr

Anyway, enough groveling, and now for the updates. I added ABS to the backs of the gauntlets to close off the gaps that I had and to tidy them up a bit. They look much better now:

20180331_113411 by Michael Halstead, on Flickr

Then, today, I reached out to a friend who is an electrical engineer who designs component parts of the Navy. It may be overkill to ask him to help me when it comes to wiring 4 tiny LED buttons, but the guy gladly helped out. I had previously purchased these LED lights as I was going to use them at first:

20180413_101849 by Michael Halstead, on Flickr

So, I harvested the parts I needed and cut off the old lights:

20180413_102036 by Michael Halstead, on Flickr

Wired them up following his diagram:

20180413_110901 by Michael Halstead, on Flickr

And now I have working button lights for my gauntlets!!!!

20180413_110924 by Michael Halstead, on Flickr

20180413_110926 by Michael Halstead, on Flickr

20180413_110929 by Michael Halstead, on Flickr

20180413_112504 by Michael Halstead, on Flickr

20180413_112508 by Michael Halstead, on Flickr

20180413_112512 by Michael Halstead, on Flickr

The one problem at this point is that my rudimentary, sausage fingery, wiring looks like a crime scene.

20180413_112657 by Michael Halstead, on Flickr

Also, once they are wired and then the top piece is put back on the gauntlet, they are real difficult to get to, should a wire come loose. I'm going to have to think about mounting that top piece on in a way that it can be removed, should the wiring need to be accessed unless I can wire them real well (not confident...).

Anyway, so that's about it for today. Need those eyeshadow makeup thingies and then I need to sand all the rough edges of the gauntlets and they are ready for paint and final assembly and hydraulic hose insertion. They are getting real close to being done!
  • Like
Mike
TK/TB/BH/DS/DZ-42125

Offline CadBane3

Re: Mike's Cad Bane
« Reply #124 on: April 16, 2018, 09:58:14 PM »
Continuing work on these gauntlets. I wanted a way to be able to remove the box that contains the lights so that I can access it for repairs, should a wire ever pop loose. I came up with some holes in the top where I mounted some Chicago screw type pieces:

20180414_105325 by Michael Halstead, on Flickr

20180414_111855 by Michael Halstead, on Flickr

Then, I painted them up and taught myself how to solder and use heat shrink tubing:

20180415_101800 by Michael Halstead, on Flickr

20180415_104736 by Michael Halstead, on Flickr

20180415_105048 by Michael Halstead, on Flickr

Still not completely pretty but I think it will serve my needs and I'm pretty darn proud of myself!

20180415_110724 by Michael Halstead, on Flickr

Then, I went to Ulta and just bought what was pretty close to what I had used before for the electroshock emitters:

20180414_144228 by Michael Halstead, on Flickr

I had to cut off the ends and sand them down, but they work pretty well:

20180415_112609 by Michael Halstead, on Flickr

20180415_114113 by Michael Halstead, on Flickr

And like that, I was ready to paint. A coat of Plasti Dip and then the same paint scheme I used on my old gauntlets and I came up with this:

20180416_153610 by Michael Halstead, on Flickr

Using some rubber washers to fill the gaps, the attachment method of the light apparatus works pretty good. I'll need to keep an eye on them to ensure that I don't lose the screw, but I have a few spares in case that happens:

20180416_155104 by Michael Halstead, on Flickr

All put together and ready for a test wear:

20180416_155653 by Michael Halstead, on Flickr

Lights work. They fit all right. Ride a bit high up my elbow, but they'll do. May need help getting dressed, but dang, they look pretty accurate to me!

Here is a comparison of them compared to one of my old gauntlets. You can see that they are much longer and will go up my arm much more, way closer to the proportions on the actual character:

20180416_155953 by Michael Halstead, on Flickr

Last piece was to attach the hydraulic hosing:

20180416_162512 by Michael Halstead, on Flickr

I'll need to add some silver paint to that tomorrow and then sew together the attachment method that hooks them up on my shoulder. Should be pretty easy.

That said, I am calling these done. Not bad for a bunch of PVC pipe, ABS plastic, magician eggs, wooden dowel, aluminum rod, eyeshadow brushes, wooden discs, rubber tubing, action figure stands, and probably a few other small odds and ends.

That will leave just the duster/jacket separation. Starting to noodle that so stay tuned. I'm hoping to have some ideas as to how that will be accomplished in the near future!

....and.... I may want to remake the hat...
  • Like
Mike
TK/TB/BH/DS/DZ-42125

Offline CadBane3

Re: Mike's Cad Bane
« Reply #125 on: May 01, 2018, 04:05:03 PM »
Got a chance to take the new gauntlets out on a test run at a troop a few weeks ago and, like any new costume, I learned a lot about areas that I wanted to tweak on this one.

Here was the troop:

40796196595_937a5133ca_o by Michael Halstead, on Flickr

And a good shot of the gauntlets in action!

41695077101_1ee404b540_o by Michael Halstead, on Flickr

Anyway, so I have been complaining a bit about how tight the fingers are on my hands. They cut the circulation off immediately and I am afraid to cut them much more as there are already several areas where I have cut through. I had previously bought latex hands from Chris Stevens Creations, but was afraid to use them as I would have to fit them through my gloves somehow and once they are through, they are permanent. Well, 30 minutes of finger tingling after the troop led me to believe that it was worth a try. So, I started cutting up these works of art:

20180421_152908 by Michael Halstead, on Flickr

And used a test glove to determine that it was possible to fit them through (that's the third pair of leather gloves that have been sacrificed to this costume for those of you keeping track at home!).

20180421_155619 by Michael Halstead, on Flickr

Once I determined that it was possible, I cut out just the parts that I would want shoved into the gloves:

20180421_212443 by Michael Halstead, on Flickr

20180421_212457 by Michael Halstead, on Flickr

And I fit them into my current gloves!

20180422_152046 by Michael Halstead, on Flickr

That left a small area on each finger where they were painted brown but need to be the color of the rest of the fingers:

20180422_152105 by Michael Halstead, on Flickr

So I mixed up a pretty good match and got them painted:

20180422_153256 by Michael Halstead, on Flickr

And now I have these:

20180422_155149 by Michael Halstead, on Flickr

20180422_155206 by Michael Halstead, on Flickr

The best part of these, besides not leading to the loss of a finger, is that they are all one piece each so I won't need to slide on each individual finger anymore and that should help me get into and out of the costume better and may reduce my need for a spotter. Also, they match the mask from a color standpoint, so I don't have fingers that don't match the mask anymore, and that's a good thing.

Another small issue I had was that my breather hoses wanted to keep popping out of the mask. They were pushed in and held in only by resistance, so me turning my head must have put too much pressure on them and they would pop out. So, I had these laying around from the hoses that Chris had initially put in:

20180501_141804 by Michael Halstead, on Flickr

I got them painted up and used some worbla and glue to sink a magnet into each one:

20180501_144457 by Michael Halstead, on Flickr

20180501_145356 by Michael Halstead, on Flickr

Now the hoses pop into place and stay put. I'm going to give them a trial run this Friday:

20180501_145741 by Michael Halstead, on Flickr

It also eliminates the chance for a hose to pop out and my face or balaclava from being seen:

20180501_145759 by Michael Halstead, on Flickr

Now, my last remaining item to work on is the duster/jacket separation, and I'm still going to do that but decided to not cut the costume up until after I can wear it for the May the 4th events. I hope to power through with some more work next week so stay tuned!
  • Like
Mike
TK/TB/BH/DS/DZ-42125

Offline Dax Corrin

Re: Mike's Cad Bane
« Reply #126 on: May 02, 2018, 10:40:01 AM »
Excellent work!!
  • Like
TI/IC/IG/IN-12485 Dax Corrin
Founder, NorthWest Quadrant Battery

Offline CadBane3

Re: Mike's Cad Bane
« Reply #127 on: May 05, 2018, 07:37:11 AM »
Well, May the 4th is done and I had 2 successful outings with this costume. The fan reaction makes all the work worth it. Here are some pics of Cad in action:

FB_IMG_1525478698946 by Michael Halstead, on Flickr

FB_IMG_1525484977609 by Michael Halstead, on Flickr

And I like this one because you can see how well the gauntlets work indoors!

20180504_193430_1525495989577 by Michael Halstead, on Flickr

Costume debrief: Well, overall, it was very successful. The new magnets attaching the hoses to my mask worked like a charm and I didn't have one instance where a hose popped out, so that was very good. I had the tip of one gauntlet dart detach but it luckily happened when I was taking the costume off, so I didn't lose it and it will be a real easy fix. Also, the new finger/glove set up works real well from a comfort standpoint. The drawbacks that I learned are that my fingers are essentially useless once I have the prosthetics on, but I think that's just how it's going to be when you put on an extra 3 inches of finger. I don't think there is really a way around that. So, all in all, it was a very successful trooping day and I was extremely happy with how well it went.

What's next? Well, I'm going to be separating the duster/jacket and working on that so stay tuned and I have hat version 3.0 in the works as I want the bill to look different. Are you ever really "done" with a costume?
  • Like
Mike
TK/TB/BH/DS/DZ-42125

Offline Bodacieah

Re: Mike's Cad Bane
« Reply #128 on: May 05, 2018, 07:43:24 AM »
Wow, so amazing! I can’t wait to see it in person!


Sent from my iPhone using Tapatalk
« Last Edit: May 23, 2018, 09:02:29 PM by CadBane3 »
  • Like

Offline DStep

Re: Mike's Cad Bane
« Reply #129 on: May 05, 2018, 09:14:13 PM »
Wow, looks great!  Good to hear it was solid!
  • Like

Offline Vaughn

Re: Mike's Cad Bane
« Reply #130 on: May 06, 2018, 11:24:58 AM »
Absolutely brilliant! It's been amazing watching your build process
  • Like
ID/DZ/SL-46602

Offline CadBane3

Re: Mike's Cad Bane
« Reply #131 on: May 09, 2018, 04:12:12 PM »
So, I was going to work on the jacket/duster separation but want to troop the UFO Parade and realized I'm out of town next week, so I didn't want it to feel rushed. So, instead, I built hat version 3.0! As I've been saying, the hat is fine and I like it better than version 1 but I didn't like the waviness of the brim. I kept trying to think about what I could use as a form for the veg tan leather that would get less of a wavy brim and more of a long slow curl. Then, I came home and my garbage can was laying on it's side and inspiration hit me! It was the perfect shape! So, I cleaned it up and then took the last bit of leather I had and ran it into the bathtub under hot water and let it soak until all the bubbles stopped coming up and used my garbage can, much to the confusion of my wife.

20180502_134333 by Michael Halstead, on Flickr

This was more like the shape I was seeking! So, I started making the top part:

20180506_100855 by Michael Halstead, on Flickr

20180506_103548 by Michael Halstead, on Flickr

20180506_110549 by Michael Halstead, on Flickr

20180506_124336 by Michael Halstead, on Flickr

20180508_134040 by Michael Halstead, on Flickr

It's a bit odd that my Cad mask is roughly the same size as a Mr. Meeseeks head, but I didn't want to accidentally glue anything to the mask, so the Meeseeks that I made for my kid was the test area.

And then paint!

20180508_210236 by Michael Halstead, on Flickr

I'm only adding these so that I can remember how I did it should I need to paint another one in the future:

20180509_145715 by Michael Halstead, on Flickr

20180509_150458 by Michael Halstead, on Flickr

This was the base color and then after I put the other colors on, I used it again to dull them down. I forgot one picture for the color that is a little orange (raw sienna).

20180509_150915 by Michael Halstead, on Flickr

20180509_151552 by Michael Halstead, on Flickr

20180509_154250 by Michael Halstead, on Flickr

So, here is the old hat:

20180509_154446 by Michael Halstead, on Flickr

As you can see, it's just a bit wavy and also the head box area is very large, and, well, boxy. Here is the new hat:

20180509_154525 by Michael Halstead, on Flickr

20180509_154937 by Michael Halstead, on Flickr

I like it and now I have options should one of them get destroyed!

So, I'll be trooping he UFO Parade and then I'll work on the jacket/duster separation in two weeks. Stay tuned!
  • Like
Mike
TK/TB/BH/DS/DZ-42125

Offline CadBane3

Re: Mike's Cad Bane
« Reply #132 on: May 20, 2018, 09:54:55 PM »
CAD BANE IS DEAD... Well, that's a bit dramatic. Perhaps on hiatus is more appropriate. I trooped the UFO Parade this weekend and had a great time. I did learn that a lot of sweat makes pleather pants heavy. Heavy pleather starts to fall down. Aliens with pants that may fall down are not as entertaining as aliens with their pants all the way up. So, I'll add a belt and perhaps some suspenders for my next troop...

20180519_145214_1526769790812 by Michael Halstead, on Flickr

Here he is waving goodbye. The reason is that the last change I've been needing to make is the jacket and duster separation. I've held off as long as I can and today, I took scissors to a perfectly acceptable and approved costume and cut it to pieces. Well, 2 pieces, but pieces nonetheless!

Here is one last look at this beauty!

20180520_125704 by Michael Halstead, on Flickr

First thing I had to do was pull apart the areas that had been glued to get it to sit right.

20180520_125908 by Michael Halstead, on Flickr

So, with a shaking hand and tears streaming down my face, I cut it in two (yes, I'm being dramatic, but you go ahead and take an approved costume and cut it up. It's not fun!). Well, it ended up looking like it didn't survive a shark attack and here is the duster part:

20180520_130438 by Michael Halstead, on Flickr

and here is the jacket part:

20180520_130503 by Michael Halstead, on Flickr

20180520_132134 by Michael Halstead, on Flickr

One good thing is that the jacket is really two separate layers of leather. Something that will come into play later as I have plans that involve Velcro, magnets, and glue. Should be fun!

20180520_132151 by Michael Halstead, on Flickr

Next, I took off the old eye and hook attachment. It wasn't really working that well anyway, so I wasn't sad to see them go.

20180520_133721 by Michael Halstead, on Flickr

Previously, in anticipation of this step, I had purchased this beautiful mesh tank top.

20180427_152348 by Michael Halstead, on Flickr

So, my costume has pleather, leather, latex, and now mesh! It's Billy Idol's dream! So, I took the zipper off the mesh tank top (and may or may not have worn it around the house for a bit... er... um... mind your business...).

So, this is a very loose (and rough) idea of what I want to do. The back part of this vest will never be seen, so I was going to use mesh similar to some vaders to help cut down on the heat factor.

20180520_134437 by Michael Halstead, on Flickr

So, for my new closure, I sewed Velcro onto the mesh and the under-layer of leather.

20180520_173750 by Michael Halstead, on Flickr

20180520_173756 by Michael Halstead, on Flickr

My plan is to just do some elastic straps with Velcro on the end to make closing easier and much more reliable than the hooks I had been using.

Then, I tossed a stitch along the neck part so that it was attached to the mesh as well:

20180520_174503 by Michael Halstead, on Flickr

And started with some leathercraft cement glue to close the front two parts of the leather back up.

20180520_212426 by Michael Halstead, on Flickr

I'll glue the other side tomorrow and then I have to start working on the jacket. I'd like to get it sealed back up so it's not a total train wreck. Once that is completed, I have some plans for magnets to keep the two of them together and in the right place while being worn and then I'll seal up the back end (i.e. outer rib section) of the vest and repaint any parts that were damaged, and I should be able to get back in the trooping game. Once this part is done, I'm taking submission photos for possible Infamous level and I am hopeful that I have made adequate changes to be considered for the CRL model. Fingers crossed!

More to come so stay tuned.
  • Like
Mike
TK/TB/BH/DS/DZ-42125

Offline CadBane3

Re: Mike's Cad Bane
« Reply #133 on: May 21, 2018, 03:59:13 PM »
I was able to glue to other side of the jacket today and it was ready to start making my strapping to close it. I initially thought about snaps but snaps have a tendency to pull out when I use them with elastic or leather and the plastic/pleather stuff that I would have to use on the vest would likely fail rather quickly, so I went with Velcro and elastic. I made these crude elastic straps with Velcro on each side and a little give in the middle:

20180521_154159 by Michael Halstead, on Flickr

Once halfway on, they look like this:

20180521_154910 by Michael Halstead, on Flickr

And then tried on what I have so far:

20180521_154614 by Michael Halstead, on Flickr

They hold the front closed, which is all I'm really concerned about at this time. The back ends (towards my ribs) feel like they want to pull inwards since they are not attached to the vest. Once I get the jacket done, I have one more idea with magnets and then I am likely back in business after a little touch up paint.

On to the next part!
  • Like
Mike
TK/TB/BH/DS/DZ-42125

Offline CadBane3

Re: Mike's Cad Bane
« Reply #134 on: May 23, 2018, 04:26:43 PM »
In the final stretch here, I hope! As I noted earlier, I wanted to use magnets to get the jacket and duster to stay together so I marked where the magnets needed to be on the jacket:

20180522_151336 by Michael Halstead, on Flickr

And then cut some spare leather and used leathercraft cement to keep them in place:

20180522_151808 by Michael Halstead, on Flickr

20180522_160645 by Michael Halstead, on Flickr

20180523_073652 by Michael Halstead, on Flickr

Then, it came time to actually close up the inside of the duster. Knowing that I was outclassed, I took it to my mom who got it sealed shut!

20180522_135755 by Michael Halstead, on Flickr

I then added magnets to the inside of it, hidden under the lapels.

20180523_114038 by Michael Halstead, on Flickr

I then gave the jacket a fresh paint job and now I have two separate pieces.
  • Like
Mike
TK/TB/BH/DS/DZ-42125

Tags: