Author Topic: Daryl's AT-AT Driver build [WTF]  (Read 46587 times)

Offline Cob

  • Cloud City Reserve
  • Posts: 178
  • IS-10054
    • Awards
    • Awards
    • Awards
  • Real Name: Josh H.
Daryl's AT-AT Driver build WIP
« Reply #30 on: May 13, 2016, 08:48:15 PM »
Looks awesome so far! One pro tip from Marc was to roll-up and cuff the pant leg then tuck that into your socks. Should work for moon boots as well. I tried dressage clips awhile back but they were a waste of money.

Have been meaning to order a Wampa suit but haven't gotten around to it. (My mon cal is already pilling.)


Sent from my iPhone using Tapatalk
« Last Edit: May 13, 2016, 08:55:36 PM by Cob »
  • Like

Offline daryldoak

Re: Daryl's AT-AT Driver build WIP
« Reply #31 on: May 14, 2016, 12:23:50 PM »
Did some additional trimming on the helmet brow and sides in order to get the face to fit properly, and also to leave room for the soda-siphon tubes:

Untitled by daryl doak, on Flickr

Untitled by daryl doak, on Flickr

Then decided to cut out the eyes and get the bubble lenses to fit.

Drill first:
Untitled by daryl doak, on Flickr

Scissors next:
Untitled by daryl doak, on Flickr

Dremel next:
Untitled by daryl doak, on Flickr

Finally, hand sanding with 100 then 220 in order to get the curves correct for the bubble lenses:
Untitled by daryl doak, on Flickr

I think it turned out pretty good:
Untitled by daryl doak, on Flickr

Untitled by daryl doak, on Flickr
« Last Edit: July 08, 2017, 06:49:35 PM by daryldoak »
  • Like
TK/TA/TS/IS/IC/BH-11371

Offline daryldoak

Re: Daryl's AT-AT Driver build WIP
« Reply #32 on: May 20, 2016, 03:02:49 PM »
Started trimming the chestbox:

Before:
Untitled by daryl doak, on Flickr

After:
Untitled by daryl doak, on Flickr

Untitled by daryl doak, on Flickr

Next, score and snap to create the mohawk strip:
Untitled by daryl doak, on Flickr

Untitled by daryl doak, on Flickr

Untitled by daryl doak, on Flickr

Decided on a 77mm mohawk.  Glued in the guide strips:
Untitled by daryl doak, on Flickr

Broke my own rule and used zap-a-gap.

Then glued on the mohawk.  This was extremely stressful and challenging.  I ended up using zap-a-gap on this also since I didn't see any way to keep it in place for a 24 hour e6000 cure time.

Untitled by daryl doak, on Flickr

It came out pretty good.  It's wonky and there are gaps along both sides, but there are on the screen used helmets also, so overall I'm happy with it.

I also cut a bit out of the front in order to have the trident sit up far enough, matching the screen-used helmet.  More on that later when I trim the trident.
Untitled by daryl doak, on Flickr

« Last Edit: July 08, 2017, 07:21:54 PM by daryldoak »
  • Like
TK/TA/TS/IS/IC/BH-11371

Offline daryldoak

Re: Daryl's AT-AT Driver build WIP
« Reply #33 on: May 21, 2016, 09:39:24 AM »
Added the rear bend using my heat gun to complete the mohawk.

Untitled by daryl doak, on Flickr

Untitled by daryl doak, on Flickr

I couldn't resist:
Untitled by daryl doak, on Flickr
« Last Edit: July 08, 2017, 07:23:02 PM by daryldoak »
  • Like
TK/TA/TS/IS/IC/BH-11371

Offline daryldoak

Re: Daryl's AT-AT Driver build WIP
« Reply #34 on: May 22, 2016, 12:05:10 PM »
So cool to have your armor vendor read your build thread on ACD and give nice compliments on your progress.

WTF!
  • Like
TK/TA/TS/IS/IC/BH-11371

Offline L Kamino

Re: Daryl's AT-AT Driver build WIP
« Reply #35 on: May 22, 2016, 02:07:01 PM »
I love your expression in that last photo.  It speaks volumes about how we've all felt getting costumes together.
  • Like
Eetla the Ewok, Darth Revan, Pilot with Rebel Legion Starfighter Command

Offline Lidocaine

Re: Daryl's AT-AT Driver build WIP
« Reply #36 on: May 22, 2016, 06:04:38 PM »
Helmet is looking good! Keep it up man!
  • Like
Luke - BH/TB/TK-44228

Offline Pixelito

  • Cloud City Retired
  • Posts: 350
  • Bats EVERYWHERE!!!
    • Awards
    • Awards
    • Awards
  • Real Name: Brian "Pix" Martino
Re: Daryl's AT-AT Driver build WIP
« Reply #37 on: May 22, 2016, 07:21:46 PM »
Yay progress!  :grin:
Keeps looking more and more awesome every time I check in!
  • Like
TK-16924
Heavy Weapons Trooper


Offline daryldoak

Re: Daryl's AT-AT Driver build WIP
« Reply #38 on: May 23, 2016, 06:06:24 PM »
Decided it was time to rough-assemble the helmet and face.  I positioned the face and drilled the holes, then attached using nuts and bolts on the face:

Untitled by daryl doak, on Flickr

and on both sides:

Untitled by daryl doak, on Flickr

Untitled by daryl doak, on Flickr

Trident and Hanger tubes are just for reference.

Did additional trimming and fitting of the trident.  In order to get it positioned the way I wanted I had to trim more off of the front of the mohawk and face:

Untitled by daryl doak, on Flickr

I like the placement.
 
Untitled by daryl doak, on Flickr

But like most people, when the trident is positioned properly on the face it is not straight on the mohawk.
Untitled by daryl doak, on Flickr

Gonna have to figure out how to trim the trident into a proper point while keeping it positioned straight on the face.
« Last Edit: July 08, 2017, 07:46:44 PM by daryldoak »
  • Like
TK/TA/TS/IS/IC/BH-11371

Offline daryldoak

Re: Daryl's AT-AT Driver build WIP
« Reply #39 on: June 02, 2016, 07:27:21 PM »
Worked on additional trimming of the trident. 

First I marked the center of the mohawk, positioned the trident how I like it on the forehead, and marked where the new "center" tip of the trident needed to be:
Untitled by daryl doak, on Flickr

Then I taped the point of the trident, to determine if the new "center" tip would look strange:
Untitled by daryl doak, on Flickr

I cut it out and I really couldn't tell it was actually off-center:
Untitled by daryl doak, on Flickr

Next was trimming the ears:
Untitled by daryl doak, on Flickr

Test fit.  They still need a bit of fine-tuning:
Untitled by daryl doak, on Flickr

Then a little work on the chestbox.  I was trying to figure out how to handle the gaps on the sides of the WTF chestbox, so they wouldn't show when the donuts were attached.  So I decided to fill them with scrap abs:
Untitled by daryl doak, on Flickr

And then hide the seam with abs paste.  This is before any sanding:
Untitled by daryl doak, on Flickr

Untitled by daryl doak, on Flickr

I think it's going to turn out good.
« Last Edit: July 08, 2017, 08:27:28 PM by daryldoak »
  • Like
TK/TA/TS/IS/IC/BH-11371

Offline daryldoak

Re: Daryl's AT-AT Driver build WIP
« Reply #40 on: July 12, 2016, 08:59:58 PM »
Finally motivated to get back to work on this project.

Got my Arduino, LEDs, and electronics kit (about a month ago) and started to prototype the chest box lights.

Untitled by daryl doak, on Flickr

Just need to figure out how I want to make it more "permanent" for an actual installation in the chestbox.

The finished the shimming for the sides of the chestbox.

Untitled by daryl doak, on Flickr

Next I trimmed the chest and back.  I left 5/16" return edge for the rubber trim.

Marking the 5/16" return edge cut line.
Untitled by daryl doak, on Flickr

Untitled by daryl doak, on Flickr

Back, with rubber trim test fit:
Untitled by daryl doak, on Flickr

Untitled by daryl doak, on Flickr

Untitled by daryl doak, on Flickr

Chest, with rubber trim test fit:
Untitled by daryl doak, on Flickr

Next I worked on attaching the ears.  I used a nail thru the ear hole to mark the location on the helmet. 

Just the screw holding them on at this point.  Not ready to commit with any glue:
Untitled by daryl doak, on Flickr

Untitled by daryl doak, on Flickr

Untitled by daryl doak, on Flickr

Untitled by daryl doak, on Flickr

There are gonna be gaps, and I'm ok with that since the reference pictures have pretty much the same gaps.  I'm not really sure where to actually glue.  I'm thinking just on the tube-to-ear connection.
« Last Edit: July 09, 2017, 09:30:48 AM by daryldoak »
  • Like
TK/TA/TS/IS/IC/BH-11371

Offline Beckett

Re: Daryl's AT-AT Driver build WIP
« Reply #41 on: July 12, 2016, 09:12:25 PM »
great build thread!
  • Like
You can also find me on Facebook: Josh Beckett or Facebook Messenger. Or if you hate those you can shoot a text to 503-999-4664
joshmbeckett@gmail.com

Offline james.p.moser

Re: Daryl's AT-AT Driver build WIP
« Reply #42 on: July 13, 2016, 11:13:29 AM »
Love it! I just got a message from Walt on my EIB application post, he's following to see if I get it. Can't wait to see your AT-AT driver done.


Jim - TK50899
  • Like
Jim - TK50899

Offline daryldoak

Re: Daryl's AT-AT Driver build WIP
« Reply #43 on: July 13, 2016, 10:35:18 PM »
As suggested by someone on ACD forums, I bought some little nuts and bolt to attached the ear and tube from the bottom.  They will be covered by the rubber trim.  I think it turned out pretty good.

Untitled by daryl doak, on Flickr

Both side still have gaps.  Still debating on whether I want to use a little glue too fix them. 

Untitled by daryl doak, on Flickr
« Last Edit: July 09, 2017, 09:41:13 AM by daryldoak »
  • Like
TK/TA/TS/IS/IC/BH-11371

Offline daryldoak

Re: Daryl's AT-AT Driver build WIP
« Reply #44 on: July 23, 2016, 10:45:03 AM »
Walt is graciously providing me with new ears so I can attempt them again.  More to come on that later.

In the meantime I have added a few pieces to the puzzle:
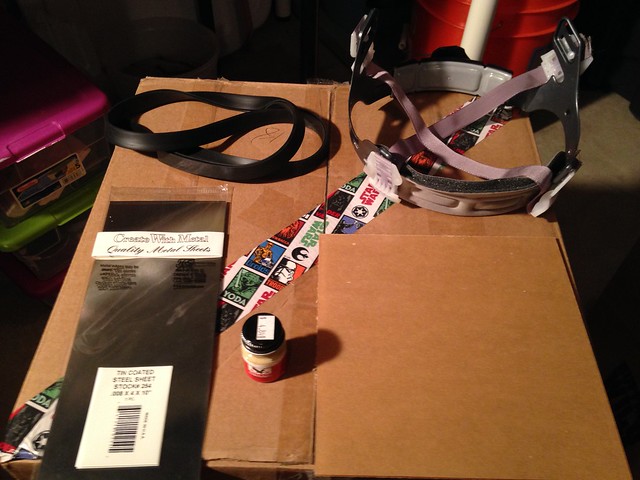
Untitled by daryl doak, on Flickr

Going clockwise from top left:
Helmet trim: 16mm.  Not sure I like this, may keep looking.
Hard-hat suspension: Going to use this in the helmet (duh).  Planning to use the same technique as Jim Moser.
Frosted acrylic sheet: This will be used for the circuit board for the back.  (it's covered in brown protective paper)
Testors Cream paint: This will be used to color the circuit board to give it that authentic yellow-brownish color.
Tin sheet: This will be used on the chest box.

I added links in my first post for these items.
« Last Edit: July 09, 2017, 09:41:36 AM by daryldoak »
  • Like
TK/TA/TS/IS/IC/BH-11371

Tags: