Author Topic: Here Comes Frank!  (Read 1295 times)

Offline CadBane3

Here Comes Frank!
« on: September 07, 2020, 08:22:38 AM »
Hello all and happy day 176 of quarantine! I've been quite bored and several months ago I slowly started a new project that won't be an approvable costume but would just be fun to see. My goal is to be able to wear it for the UFO Parade. Like several of my costumes, it all started a bit as a joke and the more I thought of it, the more I said, "why can't I build one of those?" So, here we are. I'm not even close to being done yet. My motivation has waxed and waned and I've sort of shelved it for a few months at a time. But I usually start build logs because of the peer pressure to finish a project. So, here we are. I'm finally putting it out there in hopes that it will motivate me to keep plugging away. Plus, if I get stuck, I can troll the hive mind for solutions. So, here is the ultimate goal:

sddefault by Michael Halstead, on Flickr

Or, something to that effect. That particular one was created by Adam Savage's Tested group and they are professionals with a professional budget and a professional shop. Not a fanboy in a garage with some PVC pipe, craft foam, corset boning, and a cooler full of beer. So, I figured I'd start at the feet and work my way up. The first thing I did was made some feet our of corset boning:

IMG_20200414_154355114 by Michael Halstead, on Flickr

And then the rest of the legs:

IMG_20200415_144744794 by Michael Halstead, on Flickr

IMG_20200415_170105250 by Michael Halstead, on Flickr

His legs have a bit of an animal curl to them, but they are large enough that my legs can fit straight down the middle. That's the hope, anyway. So, I needed a way to lift them when I move and I decided that I would add strips of velcro on the bottom of the foot and I would add a strip of velcro to the bottom of a sandal/slide, and then I can slip my foot, wearing only a sock, in and out, because getting shoes down the legs would be impossible.

IMG_20200419_112549032 by Michael Halstead, on Flickr

Then, I built a mannequin to hold it all together while I worked on it. Looks just like me!

IMG_20200419_134357510 by Michael Halstead, on Flickr

And a suspender set so that it can actually be worn:

IMG_20200503_220751081 by Michael Halstead, on Flickr

You can see in that pic as well that I actually have a midsection area built out of steel so that will be the top of the lower body section.

Then, I started using craft foam and adding the first later of skin:

IMG_20200512_181052473 by Michael Halstead, on Flickr

And toes:

IMG_20200607_133734847 by Michael Halstead, on Flickr

Knees:

IMG_20200607_135029502 by Michael Halstead, on Flickr

And thighs:

IMG_20200621_123512367 by Michael Halstead, on Flickr

Kinda works so far:

IMG_20200621_160513537_HDR by Michael Halstead, on Flickr
« Last Edit: September 07, 2020, 08:37:18 AM by CadBane3 »
  • Like
Mike
TK/TB/BH/DS/DZ-42125

Offline CadBane3

Re: Here's Frank!
« Reply #1 on: September 07, 2020, 08:23:27 AM »
Then, I started building the upper frame area. Now, the Rancor is supposed to be quite massive, so I will be adding a lot of weight, so I started with an Alice Pack and started adding PVC pipe to it for the main structure:

IMG_20200621_142514122 by Michael Halstead, on Flickr

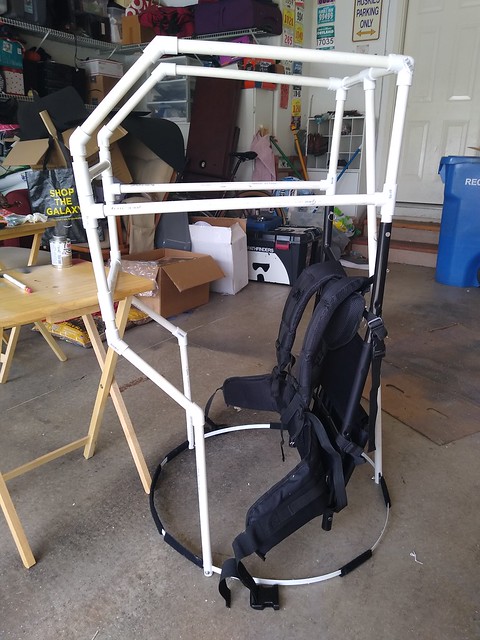
The two steel loops around the midsection velcro together when I have it on, so the hope is that they will just sort of sit on each other and keep each other in place.

IMG_20200621_160650704_HDR by Michael Halstead, on Flickr

IMG_20200621_160700593_HDR by Michael Halstead, on Flickr

And, then I added some steel to round off the top of the back and make the shoulders and upper biceps huge:

IMG_20200628_165331536 by Michael Halstead, on Flickr

IMG_20200701_173107415 by Michael Halstead, on Flickr

That also allowed me to make a rounded back, which will help create a spine area with spikes later, I hope.

Then, I made hands and since weight will be an issue, so I used pool noodles, aluminum, and digger claws from garden gloves:

IMG_20200630_102324519 by Michael Halstead, on Flickr

IMG_20200630_195930446 by Michael Halstead, on Flickr

IMG_20200701_125205379 by Michael Halstead, on Flickr

IMG_20200701_154156595 by Michael Halstead, on Flickr

I had to build a shoulder and a forearm to mount those, so I'm not gonna lie, I just started taking liberties at this point and winging it:

IMG_20200704_150017472 by Michael Halstead, on Flickr

IMG_20200704_150041840 by Michael Halstead, on Flickr

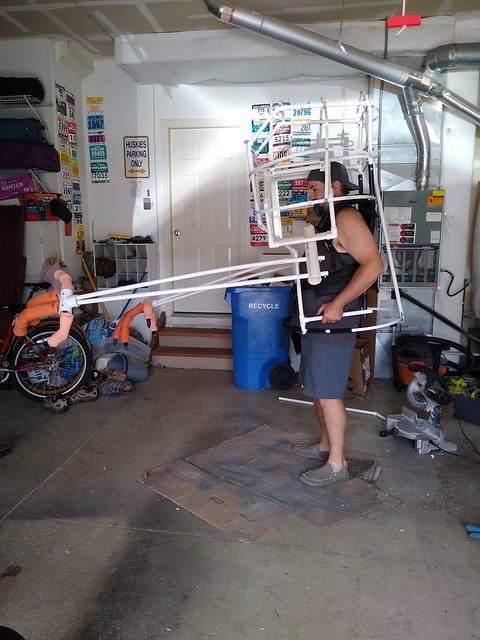
The initial shoulder I built was so large that I couldn't fit my own shoulders in the backpack any more, so I had to go back to the drawing board and cut it down a bit. I ended up with this. This pic starts to show how truly massive this project is and the "costume" will be:

IMG_20200705_130709281 by Michael Halstead, on Flickr

IMG_20200705_130713988 by Michael Halstead, on Flickr

Kinda works, but leans forward pretty far. I haz a sad:

IMG_20200705_130732194 by Michael Halstead, on Flickr

But, I powered on, figuring I can dial things in and fix them later. So, I built the rough structure for the head:

IMG_20200705_135913108 by Michael Halstead, on Flickr

IMG_20200705_135923292 by Michael Halstead, on Flickr

Then, I added a third strap that will go from the bottom of the Alice pack across my hips and will keep the whole thing from leaning forward too far. Since it's a lumbering beast, some forward lean is fine, I just don't want the fingers scraping the road.

IMG_20200718_125404021 by Michael Halstead, on Flickr

IMG_20200718_125409725 by Michael Halstead, on Flickr

Gonna be a bit rough on the back, but should be wearable!

So, now I'm at a point where I'm adding the inner layer of skin to the upper body. I have the forearms skinned and will be working on the biceps and shoulders next.

IMG_20200906_133129087 by Michael Halstead, on Flickr

After that, I'll need to add some musculature so it's not just perfect tubes for forearms.

I'm real hopeful that I can maintain some motivation and keep plugging away. There are still several areas that I need to brainstorm and figure out and I'll need to figure out how I'm going to sculpt the face. So, lots more to do but it would sure be fun if I can keep this one going.
  • Like
Mike
TK/TB/BH/DS/DZ-42125

Offline stevo502

Re: Here Comes Frank!
« Reply #2 on: September 07, 2020, 09:47:38 AM »
 :shock: :dancechewie:
  • Like

Offline CJ49er

Re: Here Comes Frank!
« Reply #3 on: September 07, 2020, 01:21:11 PM »
Beastmode activated!
  • Like
SL/TI/TK/DS/BH 12770

Offline carpe mindiem

Re: Here Comes Frank!
« Reply #4 on: September 07, 2020, 07:00:13 PM »
I love it! You’re amazing with your builds!
  • Like

Offline codo114

  • Cloud City Member
  • Posts: 35
    • Awards
    • Awards
    • Awards
Re: Here Comes Frank!
« Reply #5 on: September 07, 2020, 10:00:50 PM »
You’ve gotta do Jabba next man! If anyone can pull it off, it’s you!


Sent from my iPhone using Tapatalk
  • Like
Your Faith in your Friends is Yours

Offline Blackthorpe

Re: Here Comes Frank!
« Reply #6 on: September 08, 2020, 11:01:51 AM »
This is awesome! I'm always amazed with the stuff you pull off, so I have no doubt this will be every bit as good as Adam Savage's.
  • Like
Screaming Porgs CO, Old Rex, Jedi Knight
TI 87711

Offline Dax Corrin

Re: Here Comes Frank!
« Reply #7 on: September 10, 2020, 03:05:12 AM »
Amazing!
  • Like
TI/IC/IG/IN-12485 Dax Corrin
Founder, NorthWest Quadrant Battery

Offline MissyThing

Re: Here Comes Frank!
« Reply #8 on: September 10, 2020, 10:08:39 PM »
That’s so exciting and fun!!


Sent from my iPhone using Tapatalk
  • Like
Jedi Missy

Offline CadBane3

Re: Here Comes Frank!
« Reply #9 on: September 20, 2020, 04:17:39 PM »
Because Chris asked for it, nae, demanded it, I put a little work in on this guy today. It's definitely tough to get motivated on such a large project where I'm not sure if it'll look any good at all when I'm done, so I'm slowly plugging away.

Today, I added the foam that will make the biceps/outer shoulder area.

IMG_20200920_135557281 by Michael Halstead, on Flickr

IMG_20200920_135620001 by Michael Halstead, on Flickr

My concern is that the biceps don't have a lot of definition to differentiate them from the shoulder, but there is a large bony and spiky shoulder pauldron-like thing that goes on the outer shoulders, so I'm hopeful that adding that later will help hide some of the areas I'm concerned about. I may also be able to build up the inner bicep area and curve it to show that it comes out from the body and then forms an elbow. I have some plans with upholstery foam at a later date to try to add some muscles, so the problem may sort itself out eventually anyway.

Then, since I wanted to let that all dry before I started working on the chest and back, I started noodling how I'm going to make the face. The face has long been the largest stumbling block for me in this build since I want it to look amazing and be recognizable. I think that a good face will detract from any deficiencies around the rest of the body. Kind of how I've lived my whole life... But, I digress... So, back to the Rancor... I don't do clay sculpting and I don't know how to make silicone molds, both things I'd like to learn someday but I don't think a massive monster face is exactly starting in the shallow end, if you know what I mean. But, I do know how to just start somewhere and if that doesn't work, try again until I get something that I'm happy with, so with that said, I started with a foam cutter and gave it the old college try. I figure if I can sculpt the foam the way I want it, I can add layers and additional details later to help round it out. Teeth can be Worbla and I'm coming up with a way to make it so the mouth is open so that I can have a bit of drool and a tongue. So, here was my first effort:

IMG_20200920_150052923 by Michael Halstead, on Flickr

I liked how it was going, but as I kept cutting away and adding details, it became somewhat apparent that it may be too small to fit on the head that I've currently got built out of PVC, so I started a second effort and this time I built a lower jaw as well:

IMG_20200920_153909757 by Michael Halstead, on Flickr

Looks very Orky to me. If you play Warhammer Fantasy, you'll get the reference. It's tough to visualize how it may end up, so I didn't scrap either effort. I was thinking that I want the face to have a slight amount of roundness to it instead of being boxy, so I need to find something that I can mount the parts on to that is curved and I can keep playing with both of these and see where it takes me. As I've said before, I rarely have any build where everything works right the first time, but the problem solving is my favorite part. I'll keep working on it and come up with something.
  • Like
Mike
TK/TB/BH/DS/DZ-42125

Offline CadBane3

Re: Here Comes Frank!
« Reply #10 on: October 17, 2021, 03:11:35 PM »
Let me reopen this dead thread with a little bit about me. I'm very much driven by inspiration and by doing things. If I play Warhammer or Magic, I spend the next week hunting down new minis to paint or cards to buy. Same can be said for trooping. If we, as a garrison, are active, I get really excited about things and focus on projects and things to do. Well, with the pandemic, it's been dead and I've fallen victim of depression and loneliness, like many of you, I'm sure. So what's the equivalent of writer's block, but for building stuff? It's probably pandemic depression and if it's not, well, that's what I'm calling it. So, the lack of troops and lack of everything led me to shelve this project for about a year. I even cut the arms off and took it to storage and just packed it away thinking that maybe, someday, I'll go back to it and revisit it.

I was really just stuck with the head and didn't like my skills to make one out of foam, but I kept kicking some ideas around here and there and finally reached out a guy in Florida that makes Rancor trophy heads that you can hang over your fireplace. Asked him how large he could go and here's what he came back with! (*if my wife asks, the shipping was $30)

IMG_20210828_174843431 by Michael Halstead, on Flickr

IMG_20210828_174956518 by Michael Halstead, on Flickr

IMG_20210828_175004916 by Michael Halstead, on Flickr

The print had a few problems that need fixing and since I'm not building it out of foam, I'll need to cut down the neck area I was going to use. That's all good and can be fixed. It's also about 5-10% smaller than I wanted, but it's so awesome that I'm going to try to make it work. So, today, I glued the problem areas and then added a layer of Z-poxy finishing resin to try to add some strength to the outside and it should also help me fill in some of the print lines and other areas of trouble.

IMG_20211017_120123531 by Michael Halstead, on Flickr

IMG_20211017_122416416 by Michael Halstead, on Flickr

IMG_20211017_122422616 by Michael Halstead, on Flickr

Once I make the outside strong enough that I feel I can take out some of the supports and the inside areas, I'll figure out how to mount it on the neck area and how to make that look good. I also need to hollow out a nostril so I can mount a GoPro or something in there that will be my eyes while wearing the costume.

Anyway, it was nice to be out in the garage doing something other than laying on the couch and drinking whiskey. Hoping I can build some momentum to get back to doing fun things again.
  • Like
Mike
TK/TB/BH/DS/DZ-42125

Offline CJ49er

Re: Here Comes Frank!
« Reply #11 on: October 17, 2021, 04:51:54 PM »
It has def been tough trying to stay motivated during the recent months/years, but seeing you light this Rancor fire back up is great to see, nice work Mike!

Cant wait to meet Frank!!
  • Like
SL/TI/TK/DS/BH 12770

Offline CadBane3

Re: Here Comes Frank!
« Reply #12 on: October 19, 2021, 03:51:42 PM »
The Z-poxy did it's job and provided a shell of strength to the print. It's super smooth now so will need some sanding, but I'll get to that later. First, I wanted to pick out the mesh from it's nose so that I'll be able to mount my camera in there eventually. When picking a Rancor nose, a firm grip is necessary...

IMG_20211019_151826238 by Michael Halstead, on Flickr

Then, I took a piece out of the back so I can access the inside and cleaned out some of the supports. Now, I can see clear down to the nose:

IMG_20211019_153235163 by Michael Halstead, on Flickr

Then, I had to see what it would look like if I just mounted it on the wall...

IMG_20211019_152840084 by Michael Halstead, on Flickr

I'll have to paint those teeth and eyes later. Probably when I repaint the whole thing to match the rest of the body.

Then, I added a liberal coat of Z-poxy to the back plate piece. I'm hoping that I can make this plastic strong enough that I'll be able to add some mounting hardware and mount it directly to the neck part of the costume. Since it's hollow, it's super light weight but it's also a very thin piece of plastic, so it may need a few coats or some structural reinforcement.

IMG_20211019_153758710 by Michael Halstead, on Flickr

Now, he gets to dry out for a day or two.

IMG_20211019_153939126 by Michael Halstead, on Flickr
  • Like
Mike
TK/TB/BH/DS/DZ-42125

Offline stevo502

Re: Here Comes Frank!
« Reply #13 on: October 20, 2021, 08:01:31 AM »
Great to see you digging back in to this! Can't wait to see it in a parade!
  • Like

Tags: