Author Topic: Mike's Cad Bane  (Read 27744 times)

Offline Wingnut7901

  • Posts: 10
    • Awards
    • Awards
    • Awards
Re: Mike's Cad Bane
« Reply #30 on: November 24, 2017, 07:05:34 PM »
Most impressive!


Sent from my iPhone using Tapatalk
  • Like
"No Shields, All Guts"

Boots: En Route
Gloves: Researching
Flight Suit: Researching
Comm Pad: En Route
Hat: Researching
Belt: Researching
Armor: Researching
Helmet: Researching
Chest box: Researching

Offline CadBane3

Re: Mike's Cad Bane
« Reply #31 on: December 01, 2017, 04:18:13 PM »
Because nobody asked for it, I have a pleather update! I just get the feeling y'all aren't as excited about it as I am but whatevs. Here goes! When we left off, I had made a pair of boy shorts to die for. Now, I am working with the other parts. First thing I did was use the same spray dye to get the lower half reddish:

20171128_130524 by Michael Halstead, on Flickr

Then figure out where on the jeans I would need to cut:

20171128_130819 by Michael Halstead, on Flickr

This gave me an idea of roughly what they would look like once sewn together. First, I used a layer of fabric glue to add some strength to the bond once sewn, and sewed the two parts together:

20171130_145004 by Michael Halstead, on Flickr

Hit them with some additional red acrylic to raise where the red goes above my knees, as per the reference photos and then drybrushed/splotched a charcoal acrylic over everything. I did this to blend the colors, darken the colors, and get them to look weathered. This was done by brushing on a ton of the charcoal color and then using a paper towel to smear it around and take off the thicker parts.

20171201_140858 by Michael Halstead, on Flickr

Pretty happy with how they came out and here is my lower half, all done!

20171201_142733 by Michael Halstead, on Flickr

I'll have to get better lit photos at some point. My office has poor lighting but I think you can see that they have a reddish tint at the bottom that transitions to a more dark blue or charcoal color at the top and then I also painted a little bit of the jeans. They work pretty well and I am going to call them done for now.

Now, just gauntlets, fingertips, and gloves, and I think I am ready for submission. My gauntlets were supposed to be shipped a week ago but the guy that printed them out dropped one and it didn't like that so another piece had to be run. I'm real hopeful to see them in the next week or so. I've been told that my fingertips are next in line as well, so I'm real hopeful that this can be submitted before year end. We'll have to see. Anyway, any feedback or comments on where I am so far are certainly welcome!
  • Like
Mike
TK/TB/BH/DS/DZ-42125

Offline carpe mindiem

Re: Mike's Cad Bane
« Reply #32 on: December 01, 2017, 04:26:47 PM »
I'm TOTALLY excited about your pleather updates! :lol:

Nice work!
  • Like

Offline MissyThing

Re: Mike's Cad Bane
« Reply #33 on: December 01, 2017, 05:50:10 PM »
I dig the pleather!!


Sent from the Jedi Temple
  • Like
Jedi Missy

Offline CadBane3

Re: Mike's Cad Bane
« Reply #34 on: December 14, 2017, 03:59:45 PM »
Very small update today, but as usual, it's two steps forward and one step back. Finally received my gauntlets that I had 3D printed from a dude on Etsy. Here they are:

20171214_150537 by Michael Halstead, on Flickr

They need paint and weathering as well as the cords/hoses that will run up my arms. They also need the darts installed. We had to rescale the files and he did the best he could in getting them to print out the right size so that they would fit my forearms, but lo and behold, they are much too small. So, I started to hit the right one with the dremel.

20171214_154020 by Michael Halstead, on Flickr

Took out most of the interior lip on the upper forearm part on just one of them and it fits now, sort of. Hesitant to take off too much more, but I need to be able to fit my arm through them with an underarmor shirt. Of course, something needs to be done as my hand is all cut up now from putting them on and my forearm feels like it has plastic sticking out of it...

20171214_154101 by Michael Halstead, on Flickr

Since I'm not sure I'll be able to get them to work, I contacted the guy about stretching out the file to give me another 1/2 inch or an inch on the bottom as I could just take the bottom off and reattach a new one. They need paint anyway, so it shouldn't be too big of a deal. He is looking in to it right now. They also need a few things here and there to be completely accurate, but I'm not worried as I can make most of that out of Worbla... or pleather... not sure yet.

Anyway, at least he was a cool dude and sent a free gift for the business:

20171214_150552 by Michael Halstead, on Flickr

I've got the day off tomorrow so I'll probably spend most of it working on this and Boba. I'm sure I can figure out a way to make them work, just need to stare at them and noodle it for awhile. Cheers!
  • Like
Mike
TK/TB/BH/DS/DZ-42125

Offline CadBane3

Re: Mike's Cad Bane
« Reply #35 on: December 15, 2017, 05:04:10 PM »
Had a little time to putter on these gauntlets today. Trying to make them work, but they are just too darn small. Spent a lot of time with the dremel trying to widen the arm opening as much as possible, but everytime I would make a fist, or move my forearm, "pop," open they would go.

Angry face!

20171215_160420 by Michael Halstead, on Flickr

Took as much of the material away as I was comfortable with, but maybe I need a forearm diet.

Resting:

20171215_161916 by Michael Halstead, on Flickr

Flexed:

20171215_161918 by Michael Halstead, on Flickr

Anyway, well, I'm going to try to add another magnet to the inside of them to assist in the closure strength, but I've had enough for today. They are really close to working, but maybe I need to have the file scaled slightly larger and reprinted... Yeah, throw more money at it. That ought to solve the problem.

Resigned face...

20171215_163852 by Michael Halstead, on Flickr

Of course, I'm posting this in hopes that anybody out there has any ideas or advice. I thought about interior hinges, but they won't work as I wouldn't be able to get the pin in and out. Any other suggestions?
« Last Edit: December 16, 2017, 07:24:24 AM by Greedo10360 »
  • Like
Mike
TK/TB/BH/DS/DZ-42125

Offline CadBane3

Re: Mike's Cad Bane
« Reply #36 on: December 21, 2017, 06:30:51 PM »
Well, I've shelved the gauntlets until I get some inspiration, but in the mean time, I managed to start and finish my gloves today! Kind of risky as I don't have the prosthetic fingers/hands just yet, but they were easy enough that I can remake them if I need to get a larger size glove in the end, and they were kind of fun.

Started out with some leather gloves, punk rock studs, and some leftover distressed pig:

20171221_100224 by Michael Halstead, on Flickr

Cut off the fingers:

20171221_121940 by Michael Halstead, on Flickr

Cad's a punk rocker!!! Kind of wanted to leave them like this and wear them around...

20171221_123609 by Michael Halstead, on Flickr

But, alas, I had work to do, so I glued on the extra leather pieces that I cut to shape:

20171221_130238 by Michael Halstead, on Flickr

Here they are with the glue dry. For this I use Leathercraft Cement that works quickly and does a really nice job of gluing the leather together and remaining flexible after it dries:

20171221_151709 by Michael Halstead, on Flickr

Painted the leather parts and used some acrylic charcoal color to dirty up the studs, which I will put some clear nail polish on to try to keep the color more durable later, and then found another use for my makeshift helmet stand:

20171221_181006 by Michael Halstead, on Flickr

They even have this odd "strap" of leather across the inside:

20171221_181019 by Michael Halstead, on Flickr

And, they fit like a... well, you get the point:

20171221_181026 by Michael Halstead, on Flickr

Last things left are the prosthetic hands, which are on order from 2 different places and the gauntlets, which have become a bit of a nightmare and a money pit. Seriously thinking about starting from scratch on them and making them out of craft foam and worbla. Unless inspiration hits, that may be the way to go as these gloves add enough thickness around my wrist that there is no way I can make the existing ones work. Maybe I'll have some time to ponder them over the Christmas break. Merry Christmas all and have a safe and happy New Year!
  • Like
Mike
TK/TB/BH/DS/DZ-42125

Offline carpe mindiem

Re: Mike's Cad Bane
« Reply #37 on: December 21, 2017, 06:34:06 PM »
Lookin' good!
  • Like

Offline CadBane3

Re: Mike's Cad Bane
« Reply #38 on: December 23, 2017, 04:08:52 PM »
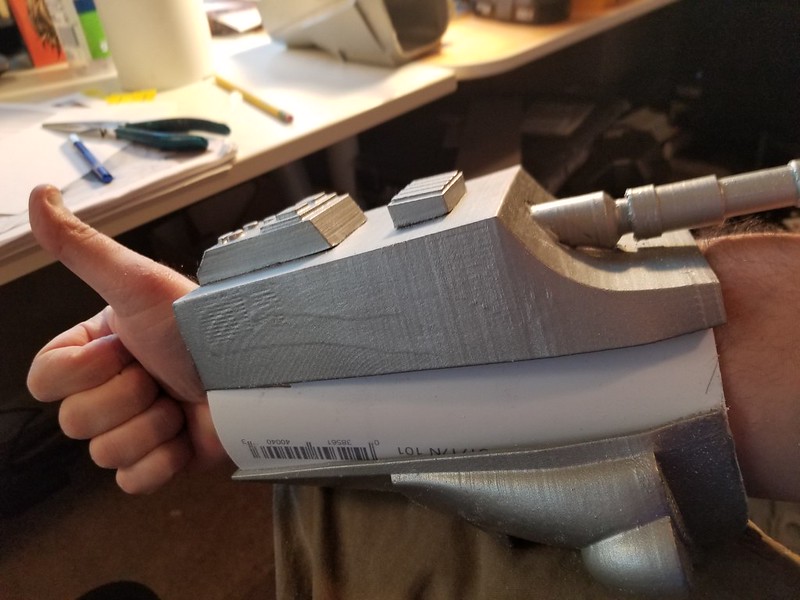
Gauntlets! These have been probably the most difficult and intimidating part of this build. When we left off, my forearms were too large for the ones I secured and I was frustrated and sad...

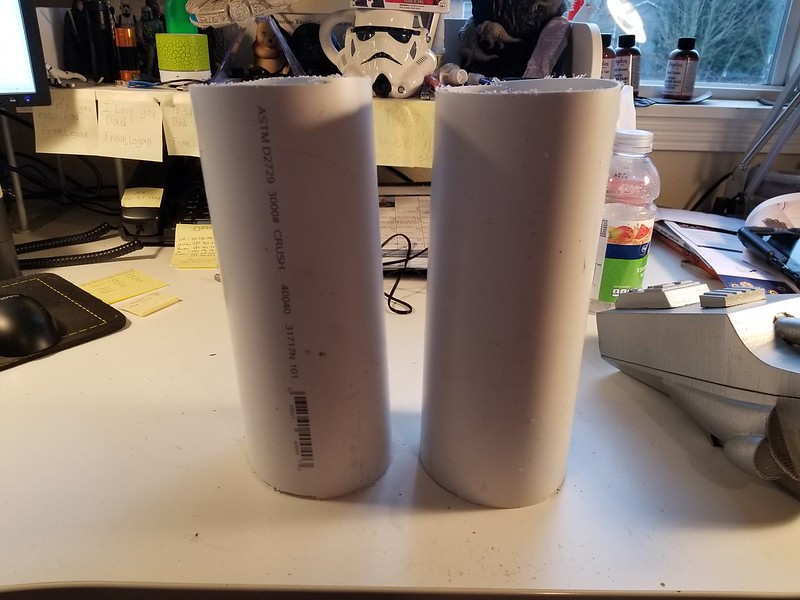
Well, no more! I took one of my patented aimless walks around Parkrose Hardware and thought, what I really need is a tube that I can fit my arm through and then I can built the gauntlet on top of that. So, I ended up purchasing 10 feet of 4 inch wide sewage pipe. They only sell it by that length, so if anybody is in the market for some leftover pipe, I got ya covered.

I started out with two large tubes:

20171222_141512 by Michael Halstead, on Flickr

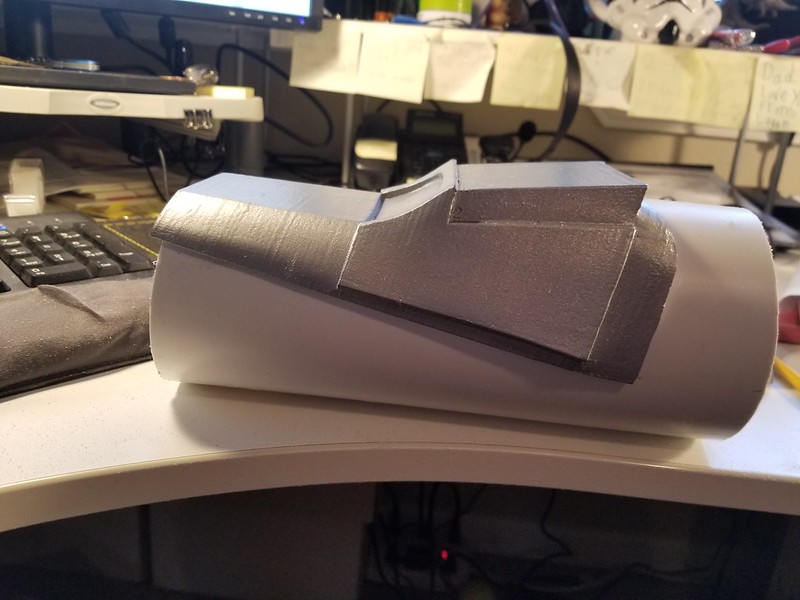
Then I went to town on them with the Dremel:

20171222_145406 by Michael Halstead, on Flickr

Basically cutting parts out so that the existing parts will fit flush on top of them:

20171222_145419 by Michael Halstead, on Flickr

20171222_150206 by Michael Halstead, on Flickr

20171222_150618 by Michael Halstead, on Flickr

Now we're making progress!

20171222_150634 by Michael Halstead, on Flickr

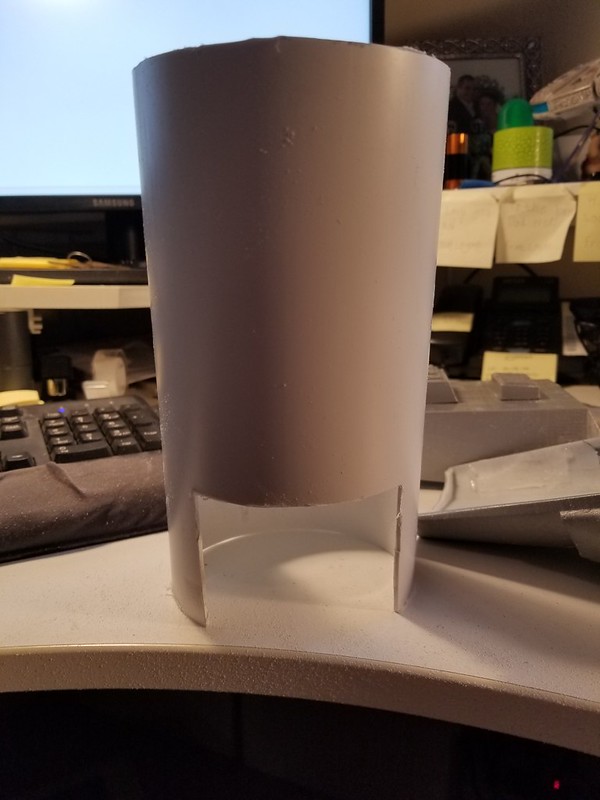
Repeat for the other side and you end up with this:

20171222_154949 by Michael Halstead, on Flickr

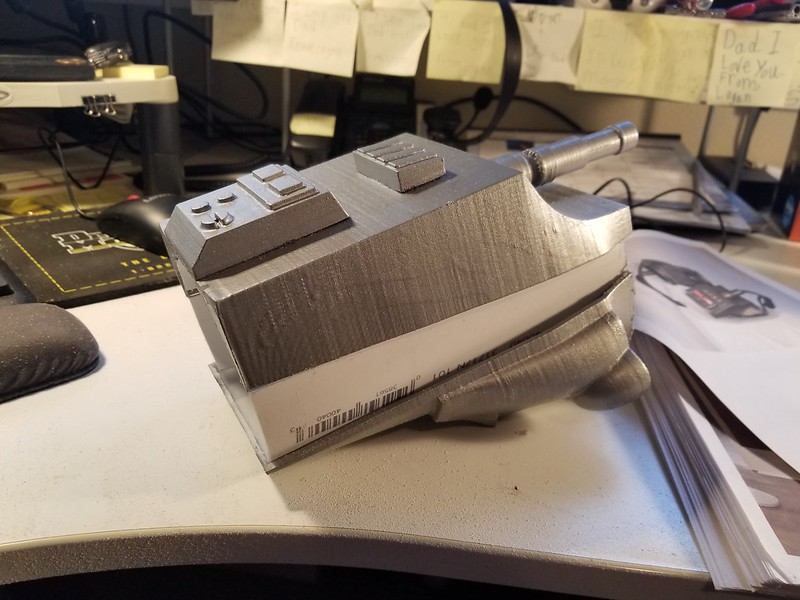
Once I was satisfied with the fit, I went to town with the epoxy. So much that my family will not even enter my office now. Perhaps that's not such a bad thing...

20171223_123634 by Michael Halstead, on Flickr

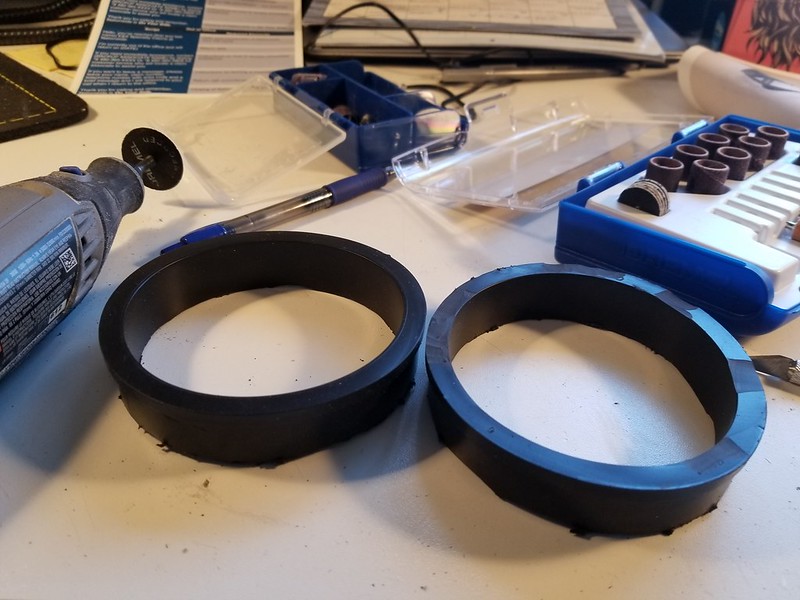
Then, I was thinking that they were missing a part. The gauntlets that Cad wears has a cuff on the wrist part, but these 3D prints didn't have anything like that, so back to Parkrose! Came up with one of these. They best part is that it is made of rubber, so it's much more malleable than the hard PVC pipe, which I'm sure will be important in making my gloves last longer.

20171223_123852 by Michael Halstead, on Flickr

Cut off the parts that I need:

20171223_132429 by Michael Halstead, on Flickr

Then, epoxy them in place!

20171223_134217 by Michael Halstead, on Flickr

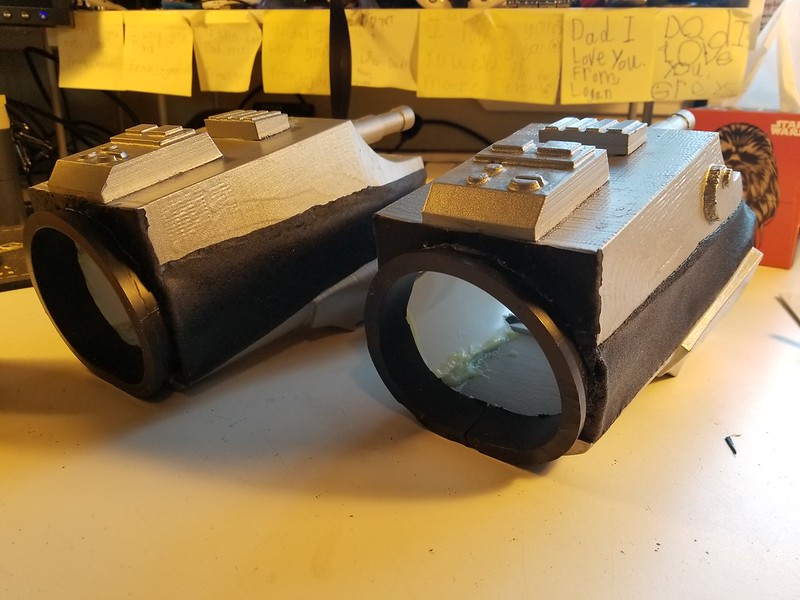
Then, I returned to my second favorite material, Worbla, and started filling in the side gaps that the gauntlets had from where the pipe was showing.

20171223_142941 by Michael Halstead, on Flickr

Secured the wrist darts in place:

20171223_150422 by Michael Halstead, on Flickr

Then, there are several small greeblies on the sides of the gauntlets. Not sure what they are, but I stole these from my wife's makeup drawer:

20171223_150944 by Michael Halstead, on Flickr

They work perfect!

20171223_151740 by Michael Halstead, on Flickr

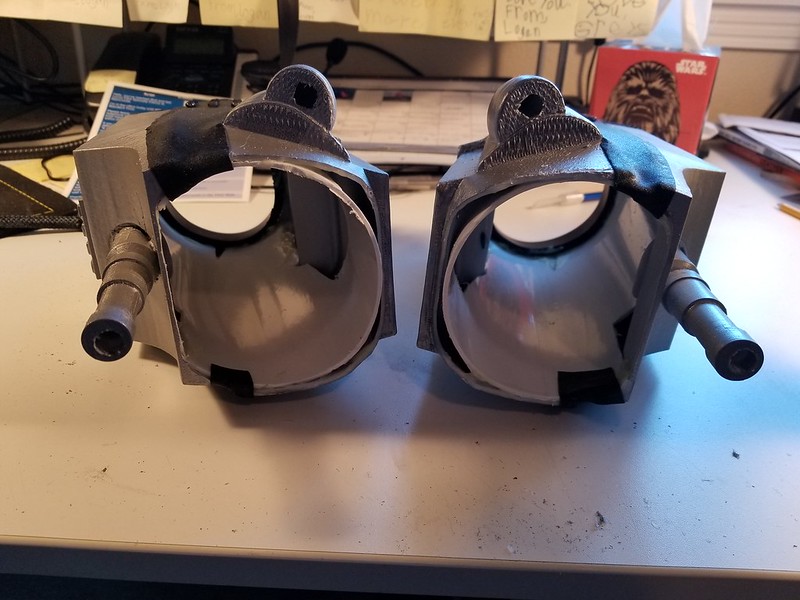
Drilled holes in the back for where the hoses will insert:

20171223_152150 by Michael Halstead, on Flickr

Oh, and speaking of the hoses. I heard from my build mentor, NightShine, and she had extra hose material that she used laying around so she shipped me enough that I will need for my build. How cool is that!?!?!
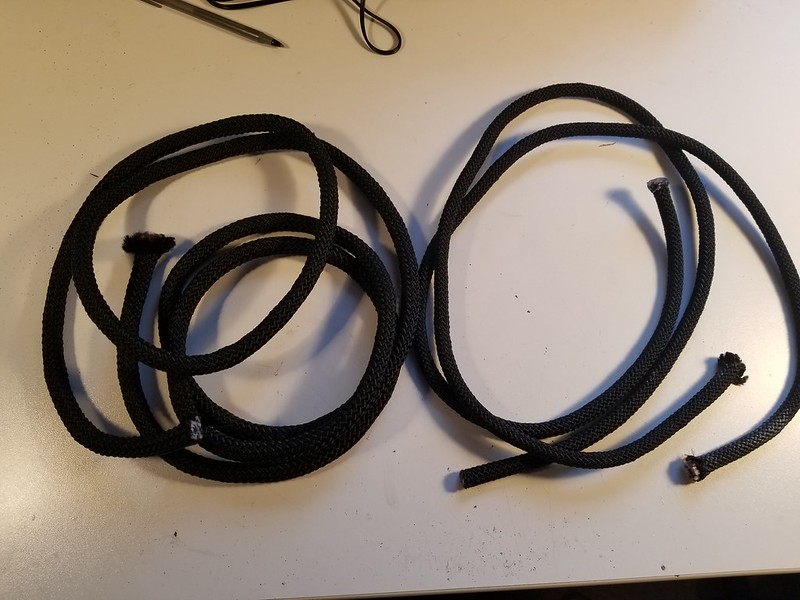
20171222_111445 by Michael Halstead, on Flickr

That's all for now. I'm so freaking proud of myself! I've put wood glue on the Worbla pieces so that they will be smooth when I apply paint and then I'll get them painted up and get the hoses attached and then post another update. So freaking happy with how these came out!!!!
« Last Edit: December 23, 2017, 04:10:53 PM by Greedo10360 »
  • Like
Mike
TK/TB/BH/DS/DZ-42125

Offline carpe mindiem

Re: Mike's Cad Bane
« Reply #39 on: December 23, 2017, 06:16:44 PM »
Awesome, as usual!
  • Like

Offline Wingnut7901

  • Posts: 10
    • Awards
    • Awards
    • Awards
Re: Mike's Cad Bane
« Reply #40 on: December 23, 2017, 08:42:55 PM »
Really impressive!


Sent from my iPhone using Tapatalk
  • Like
"No Shields, All Guts"

Boots: En Route
Gloves: Researching
Flight Suit: Researching
Comm Pad: En Route
Hat: Researching
Belt: Researching
Armor: Researching
Helmet: Researching
Chest box: Researching

Offline CadBane3

Re: Mike's Cad Bane
« Reply #41 on: December 27, 2017, 03:28:50 PM »
So, when I left off, I had essentially the form of the gauntlets completed, but the transition from Worbla to 3d printed parts left a large transition area that I wasn't happy with. I hit them with some primer, and you can see the area I'm talking about in this photo:

20171224_221851 by Michael Halstead, on Flickr

So, I got some Gesso and started filling in that gap and once dried, you can actually sand it down to assist with a smoother transition:

20171225_090615 by Michael Halstead, on Flickr

I then took some more advice from NightShine and hit them with a layer of Plasti-Dip, so that the entire gauntlet is essentially the same material on the top layer:

20171226_131305 by Michael Halstead, on Flickr

Then, I hit them with a grey layer of paint:

20171226_132716 by Michael Halstead, on Flickr

But, I reviewed the source material and they are either grey or they have a blue tint to them. I liked the blue tint a bit better, so I hit them with a very dark blue as well as the colors I needed to pull out the details:

20171227_125603 by Michael Halstead, on Flickr

Then, I hit them with a dark grey drybrush, just to pull out the edge highlights and to dirty them up a bit and then hit them with a seal coat:

20171227_130019 by Michael Halstead, on Flickr

I'm going to hit the red buttons with a shiny nail polish or something so that they have more of a glowing look.

They fit awesome and I'm stoked at what I've done. So happy!

20171227_140720 by Michael Halstead, on Flickr

Lastly, I started to epoxy in the cords that come out of them:

20171227_151116 by Michael Halstead, on Flickr

These will need some silver paint drybrushed onto them once the epoxy dries and then I will figure out a way to attach them up my sleeves, probably using the swivel hooks you see at the bottom of the picture.

Once that's done, all I have left for submittal is the prosthetic fingers. May see if I can find some from a Halloween store or something that can be cut off and painted and used, but I have a few on order from different sources. It just takes time to make fake fingers, I guess. I hope to kit up and take a few pictures of where I stand at this point so you call can see, but it's just about time for happy hour! That's about it for now!
  • Like
Mike
TK/TB/BH/DS/DZ-42125

Offline nukem25rs

Re: Mike's Cad Bane
« Reply #42 on: December 27, 2017, 04:30:12 PM »
looks good Mike, making me want to do that costume some time!

 I thought i saw someone post making some duros hands in the last few months on here...

another good coating material for 3d printed parts is Zpoxy.. can paint it on and it smooths all the layer lines and imperfections in 3d prints.. and is sandable to smooth.

wheres the pleather!!

  • Like
Mike Kraemer
TK/AR-71508
Centurion 285
Whitearmor.net user- NUKEM25RS
R2-Q5  Astromech.net user Nukem25rs
ARC Trooper Havoc
501stClonetroopers.com User Nukem25rs

Offline CadBane3

Re: Mike's Cad Bane
« Reply #43 on: December 27, 2017, 05:48:30 PM »
Haha! Thanks Mike! Yeah, I haven't been able to use pleather for awhile. Going into withdrawals! Yeah, somebody was making Duros hands and I asked for a set but it went nowhere. I'll have to see of I can reengage. Thanks for the reminder!

Thanks for the tip on Zpoxy. Never heard of it, but if it's caustic for my lungs, I'm in!!!!
  • Like
Mike
TK/TB/BH/DS/DZ-42125

Offline CadBane3

Re: Mike's Cad Bane
« Reply #44 on: December 28, 2017, 03:24:54 PM »
Alright, this will probably be my last update until I can get some fingers. Today, I made a connection point for the hoses on my gauntlets to run them up my arm. I built two of these:

20171228_121300 by Michael Halstead, on Flickr

And then sewed them to the inside of the jacket (it's not pretty but won't be visible):

20171228_121315 by Michael Halstead, on Flickr

Then, I cut the hoses/rope to length and put some hot glue on the end, then sewed all three parts together:

20171228_125352 by Michael Halstead, on Flickr

Last step was weathering the hoses with some silver. They look better in person, but I'm calling the gauntlets done.

20171228_135429 by Michael Halstead, on Flickr

I also added some clear nail polish to the buttons so that they have a shine/glow to them. Thought it looked cool.

Well, that's the whole costume for now. Need some fingers and I'm all done and can submit to the BHG for feedback and, hopefully, approval. I'll see if I can put the whole thing on later and post some pictures of where it stands now. Thanks all for the input and for following along. Fingers crossed that I can get my hands on some fingers!
« Last Edit: December 28, 2017, 03:26:58 PM by Greedo10360 »
  • Like
Mike
TK/TB/BH/DS/DZ-42125

Tags: