Author Topic: Daryl's Anovos ANH Stunt TK Build  (Read 51698 times)

Offline daryldoak

Re: Daryl's Anovos ANH Stunt TK Build
« Reply #15 on: February 01, 2016, 09:01:58 AM »
Steve,

I completely removed all the return at the wrist, and I have the upper return on the forearms (16&17) at about 1/4".

I've been debating taking it to about 1/8", but I'd also like to keep it 1/4" so I have room to enlarge it later if I need more room.

For the biceps I have the upper return at 1/8" and the lower at 1/4".

I have really skinny arms so I've had to trim the forearms and biceps quite a bit.  Sizing the arms is so stressful!!

Here is a good post on return edges.

http://www.whitearmor.net/forum/topic/31930-return-edges/

I'm going to need to reshape my forearms, since I had to make them smaller they are both oval shaped right now.  I know you can use a heat gun (which I don't current have) or hot water to reshape.  I'll need to figure that out.
  • Like
TK/TA/TS/IS/IC/BH-11371

Offline daryldoak

Re: Daryl's Anovos ANH Stunt TK Build
« Reply #16 on: February 01, 2016, 10:53:07 AM »
Chris,

I did have to trim a little length from the wrist end of 17 after I made the pieces fit my arms.  17 was about 1/2" longer than 16. There is a pic above.

Other than that, I think the length is ok.
  • Like
TK/TA/TS/IS/IC/BH-11371

Offline daryldoak

Re: Daryl's Anovos ANH Stunt TK Build
« Reply #17 on: February 02, 2016, 02:18:50 PM »
Made a little more progress.

Continued fine-tuning the fit of the forearms and biceps, not ready to commit to gluing yet.

Trimmed the ab button plates to remove all of the return edge.

Before:
Untitled by daryl doak, on Flickr

After, test fit:
Untitled by daryl doak, on Flickr

I really want to paint these buttons.  Hopefully that will occur soon.

Then, following ukswrath's build, I began trimming the front return edges on the shins, leaving on 10mm on each side, to fit the 20mm cover strip:

Untitled by daryl doak, on Flickr

The right shin does not have a well defined return edge, so I had to draw a guide line for my 10mm starting point:

Untitled by daryl doak, on Flickr

I think they turned out pretty good:

Untitled by daryl doak, on Flickr

Next I did the same trimming on the front of the thighs, leaving 10mm on each side for the 20mm cover strip:

Untitled by daryl doak, on Flickr

Next up will probably be trimming the backs of the shins and thigh to fit properly.

I'm really enjoying this build, just wish I had more time. :)

« Last Edit: February 02, 2016, 05:18:04 PM by daryldoak »
  • Like
TK/TA/TS/IS/IC/BH-11371

Offline daryldoak

Re: Daryl's Anovos ANH Stunt TK Build
« Reply #18 on: February 02, 2016, 03:20:29 PM »
Decided to try and see if I could get the rivet covers off of the belt. 

First I removed the Chicago screws from the belt, removing the holster.  Then I used a xacto and a small screwdriver to make sure all the rivet cover corners were free from the plastic belt.  Then I drilled out the rivets from the back until they "broke" and I was able to remove the rivets from the plastic belt.

Belt is free, with minimal/no damage.  All of the scratches will be covered after the rebuild anyway, or I'll repair them.

Untitled by daryl doak, on Flickr

Just gotta remove the rivet from the covers:

Untitled by daryl doak, on Flickr

It's now ready for my TKittell belt
Untitled by daryl doak, on Flickr
« Last Edit: February 02, 2016, 06:54:00 PM by daryldoak »
  • Like
TK/TA/TS/IS/IC/BH-11371

Offline daryldoak

Re: Daryl's Anovos ANH Stunt TK Build
« Reply #19 on: February 03, 2016, 03:26:55 PM »
More fine-tuning the fit of the forearms and biceps, I took the return edge down to about 1/8", which I think looks better when the forearms are so small.  Still not ready commit to gluing yet.  Anyone have any thoughts/comments/opinions on the firearm/bicep return edges?

Untitled by daryl doak, on Flickr

Then I worked a little on cleaning up the rivet covers.

before:
Untitled by daryl doak, on Flickr

after:
Untitled by daryl doak, on Flickr

To remove the rivets I used an xacto knife on one, needle nose pliers on another, and for the last one, a drill.  The I removed the glue residue by using some chisels that I bought for my Doopy Doos E-11 project. 

The center rivet hole on my plastic belt did sustain a little damage when the rivet came thru:
Untitled by daryl doak, on Flickr

But I'm thinking I will just use a washer to support the hole when I rivet the plastic onto the new canvas belt.

Overall I'm happy with how the belt conversion is going.
  • Like
TK/TA/TS/IS/IC/BH-11371

Offline Spurgco

  • Cloud City Retired
  • Posts: 118
  • Independent Dealer for Industrial Automation
  • Awards Trooped 10+ times
  • Awards Trooped 10+ times
  • Awards Trooped 10+ times
    • Awards
    • Awards
    • Awards
  • Real Name: Steve S. Aka Evil Steve
Re: Daryl's Anovos ANH Stunt TK Build
« Reply #20 on: February 04, 2016, 05:38:39 AM »
Thanks for the link. Sets my mind at ease. First time, and i am trying to build it for approval.
  • Like
Independent Dealer for Industrial Automation, Marius Technologies, and Gizmonic Institute Droids and Automata.
Field Service and Transport
Since 2011

Offline daryldoak

Re: Daryl's Anovos ANH Stunt TK Build
« Reply #21 on: February 05, 2016, 09:15:31 PM »
Got a little accomplished tonight.

I seem to have analysis-paralysis on sizing the biceps and forearms, and I haven't sized the thighs or shins yet, so I decided to work on my belt conversion instead.

The first task was adding the male snaps to the ab.  I used the Anovos instructions for the basic placement, but I also put my plastic belt on the ab to verify that the snaps would end up in the outer ammo sections. 

Untitled by daryl doak, on Flickr

After double and triple thinking about it I decided to make the first hole in my armor.  Instead of drilling I used the soldering iron technique I saw on TK-1636's video series.  It worked good.

Untitled by daryl doak, on Flickr

Before actually adding a snap to the ab I practiced on an abs scrap.  Seemed easy.  Then I added a snap to the ab.  The first one came out crooked, so I removed it and tried again.  I did get both on, but holding the ab and hammering the snap by myself was a little difficult.

Untitled by daryl doak, on Flickr

Next it was time to add the female snaps to the canvas belt.  I found the center of the belt and held it in place on the ab.  Then I pressed hard on the belt over each male snap in order to make a mark in the canvas.  Then I marked it with a pencil.  I was really nervous about screwing up the belt placement so I decided to put the ab and the belt on and view myself in the mirror.  Looked good and I was ready to commit.  So I used the soldering iron hole technique again on the belt.  I put the hole in one side, and added the snap, which went on crooked again, had to redo (good thing I bought a lot of Tandy snaps).  Then I attached the belt to the ab and verified I had properly marked the hole for the second snap.  Then I repeated the process for the second snap.  I'm happy with how it turned out.

Untitled by daryl doak, on Flickr

Next, I really wanted to attach the plastic belt to the canvas belt.  I've never used a rivet gun before.  Earlier today I bought a rivet gun which came with various sizes of rivets.  I also bought some washers.  Turns out 3/16" is the proper diameter for the plastic belt holes, but the 1/4" length is not long enough to go thru the canvas belt with internal plastic and the plastic belt.  So I went back to the hardware store, but I arrived right when they were closing.  So I wasn't able to finish the belt tonight.

So I decided to cut some inner cover strips from my scrap abs for my shins and thighs.

In other news... I received my Mr No Stripes bracket system and my Trooperbay gloves and hand plates in the mail, so that was exciting.
  • Like
TK/TA/TS/IS/IC/BH-11371

Offline daryldoak

Re: Daryl's Anovos ANH Stunt TK Build
« Reply #22 on: February 06, 2016, 04:24:48 PM »
Last night I decided to do this:

Untitled by daryl doak, on Flickr

I'm going to repaint the frown using my Humbrol #5 Admiral Gray, attempting to make the frown come to points, using one of the FISD reference stunt frowns.  So many variations to choose from.

Untitled by daryl doak, on Flickr

I'm leaning towards something like the second one down on the left.

Today I got more rivets and mostly finished my belt conversion.

I bought 3/16" diameter with 1/4" grip.  The diameter was perfect, but the depth was a little too much, but 1/8" was too shallow.  So I would recommend something in the middle.

I made the center hole in the canvas using the soldering iron and then attached the plastic to the canvas thru the hole using one the chicago screws from my holster.  Then in order to mark the two outer holes I attached the belt to the ab, and put it on again.  Then I repeated hole-making process for the two outer holes.

Then I put the two drop boxes onto the canvas, via the elastic loops, and attached the plastic "permanently" to the canvas using the rivets.

Untitled by daryl doak, on Flickr

I just need to glue on the rivet covers and attach my holster.
  • Like
TK/TA/TS/IS/IC/BH-11371

Offline daryldoak

Re: Daryl's Anovos ANH Stunt TK Build
« Reply #23 on: February 06, 2016, 10:28:24 PM »
It was time to glue something, so I decided to start with a fairly low-risk bicep.  After a final size test I found the bicep cover strips and I rounded the corners with sandpaper.  Then prepared my magnets with some painters tape and got my clamps ready.  I applied the e6000 to the cover strip, centered it as best I could, then put on the clamps and magnets.  I was happy with how the first one went so I decided to do both of them.

Untitled by daryl doak, on Flickr

I can tell I'm going to need more magnets when I do the thighs and shins.

Don't forget to remove the protective plastic from the cover strip before gluing.  I saw a FB post from a guy who forgot.
« Last Edit: February 06, 2016, 10:30:11 PM by daryldoak »
  • Like
TK/TA/TS/IS/IC/BH-11371

Offline daryldoak

Re: Daryl's Anovos ANH Stunt TK Build
« Reply #24 on: February 07, 2016, 12:18:11 PM »
Gluing the biceps last night gave me the confidence I needed to move forward on things I've been procrastinating.

So I decided to start today by sizing/trimming the thighs.  The right side didn't need much trimming, maybe 3/4".  After I trimmed the right side I taped it together for a test fit, then I measured the the circumference at the top and bottom and made the left side match.  The left side needed about 2" cutoff.

On both sides I made sure to cut from whichever side was longer, for the purpose of making sure the rear cover strip was centered as much as possible on the rear of the thigh.

Untitled by daryl doak, on Flickr

Next I decided that I want to begin gluing the forearms.  But since I had to trim quite a bit off of the forearms I lost a lot of the curve.  They are not shaped properly for a cover strip to have a good, flat surface to adhere to.

Untitled by daryl doak, on Flickr

So it was time to learn how to use the heat gun that I bought.  I have watched the TK-1636 video where he reshapes biceps, so I had a basic idea.  I set the forearm piece on the garage floor and heated it along the top of each side (sorry, hard to describe) until it was hot to the touch.  Then I picked up the piece and formed it how I wanted it with my hands, making sure to form a nice circle shape, and being careful not to cause a crease in the return edge.  Then I repeated for each piece.  I like the results:

Untitled by daryl doak, on Flickr

I think I got a good surface for gluing now.  I plan to get more clamps and magnets today and begin the forearm gluing.
  • Like
TK/TA/TS/IS/IC/BH-11371

Offline CJ49er

Re: Daryl's Anovos ANH Stunt TK Build
« Reply #25 on: February 07, 2016, 12:48:39 PM »
nice work on getting the curve back in those forearms. I must admit, when I looked at the first pic of them flat, I got scared, until I scrolled down. :)
  • Like
SL/TI/TK/DS/BH 12770

Offline RainTrooper

  • Cloud City Retired
  • Posts: 563
    • Awards
    • Awards
    • Awards
  • Real Name: Jason
Re: Daryl's Anovos ANH Stunt TK Build
« Reply #26 on: February 07, 2016, 05:43:37 PM »
Looking great! Keep up the awesome work, Daryl!!  :grin:
  • Like
TK/TD-76216


Offline daryldoak

Re: Daryl's Anovos ANH Stunt TK Build
« Reply #27 on: February 08, 2016, 09:35:22 PM »
I made some more progress over the last two days.

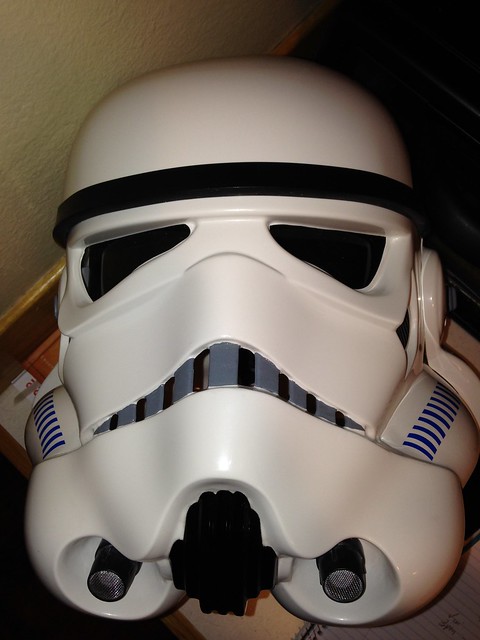
During the Super Bowl I repainted my frown, adding the tapering at the ends. I'm happy with how it turned out, and it was good practice with the Humbrol paint before I paint the ab buttons.  Still debating if I want to trim the eyes or not.

Untitled by daryl doak, on Flickr

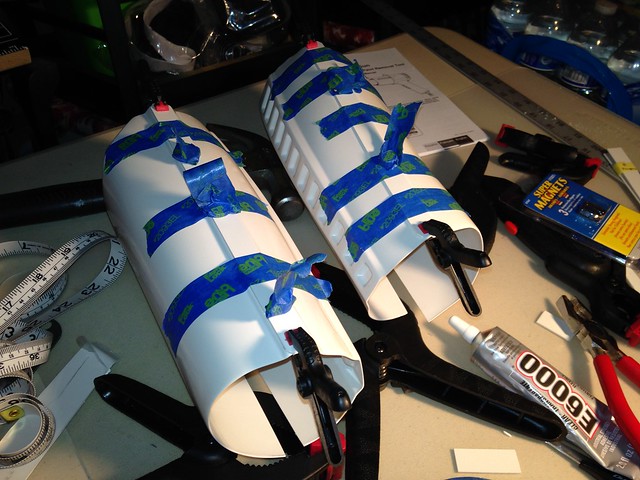
Then I made more progress gluing my arms.

Untitled by daryl doak, on Flickr

Here's how they look today.

Untitled by daryl doak, on Flickr


I gotta say, thank goodness I decided to use E6000.  The stuff is so forgiving.  I've really needed that ability to reposition the coverstrip in order to get it right.  For beginners like me I highly recommend starting with the shortest cover strips and move up.  I've found the longer the strip, the more complex, and the more magnets you need!!

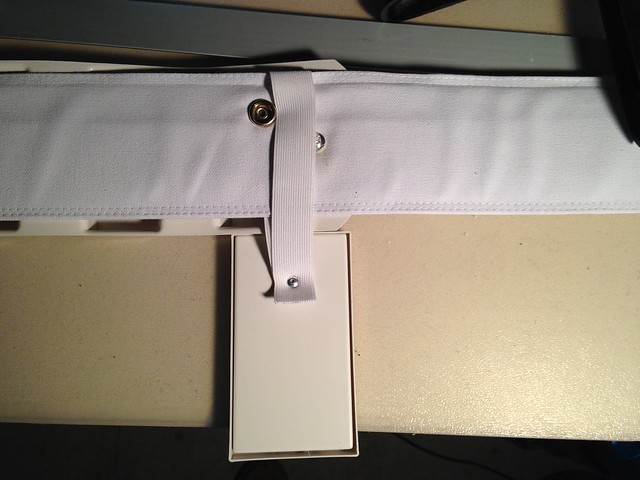
Then I decided to further mod my belt, so I cut off the drop boxes, removed the Anovos elastics, cut new elastic, drills holes, and attached with rivets.  Then I glued the elastic into proper position (aligned with end of plastic belt) using E6000.

Untitled by daryl doak, on Flickr

Untitled by daryl doak, on Flickr

This was not a necessary change, but after I replaced the canvas and bought a rivet gun I figured "what the heck?" might as well go all the way.

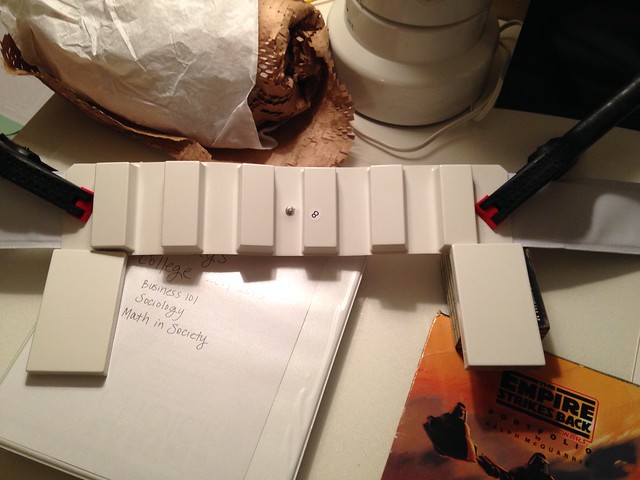
When almost all of my magnets were free I decided "why not try to get both thighs done tonight?".  Big mistake.  I have nowhere near enough magnets to do both simultaneously.

I started with the right one, got it all taped and magneted.  Then I decided that the strip was not positioned well. So I messed with it for a while, taping and retaping, moving magnets, until finally decided I made a mistake and took it apart and set it aside so the glue would dry.  Removing the dried glue is really easy, it's kinda like rubber cement.

So I came to the realization that only one thigh was getting done tonight. So I picked up the left one, cut the cover strip and began gluing.  This one went much better, though I still wish I had more magnets.  Also, clamps don't work that well on the thighs.  Not enough reach.
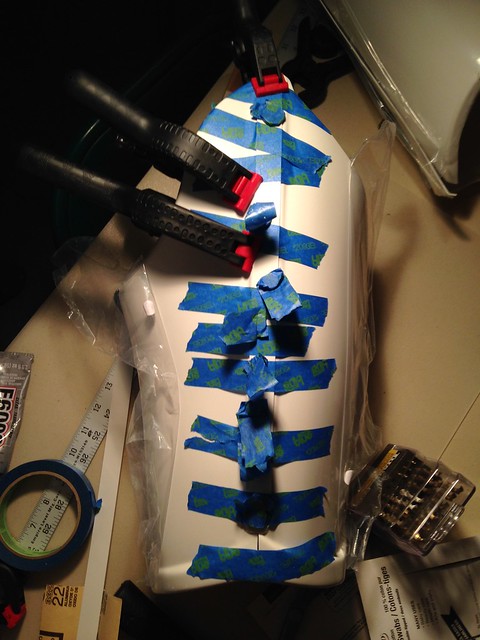
Untitled by daryl doak, on Flickr

I will conquer the right thigh tomorrow night.
  • Like
TK/TA/TS/IS/IC/BH-11371

Offline daryldoak

Re: Daryl's Anovos ANH Stunt TK Build
« Reply #28 on: February 09, 2016, 08:55:58 PM »
Today's update.

Glued on the rivet covers, and tacked down the elastic that was sticking out a little on the back of the drop boxes.

Untitled by daryl doak, on Flickr

Then, following ukswrath's lead, I decided to work on my mrnostripes bracket system.  First I cleaned up all the necessary return edges with my scissors and sandpaper.  Then I measured, and matched, and marked all the bracket locations.

Untitled by daryl doak, on Flickr

Untitled by daryl doak, on Flickr

Untitled by daryl doak, on Flickr

It's been 24 hours since I last glued something, so it's time to glue the next piece, right thigh:

Untitled by daryl doak, on Flickr

This thigh was 100x easier than the left thigh.  I was much more prepared for how difficult it was going to be.  Had my full magnet set ready, pieces of tape ready, and got the cover strip positioned in just a couple of minutes.
  • Like
TK/TA/TS/IS/IC/BH-11371

Offline Rat

  • Cloud City Member
  • Posts: 909
    • Awards
    • Awards
    • Awards
Re: Daryl's Anovos ANH Stunt TK Build
« Reply #29 on: February 10, 2016, 12:27:27 AM »
looking good Daryl.  No issues with length yet? My forearms almost seem like they need to be shortened. (I ordered the Large, when maybe I should have went with medium)

The ANOVOS sizes were only for the under armor/compression suit not the armor. The armor is one size.
  • Like

Tags: