Author Topic: Mike's Cad Bane  (Read 28143 times)

Offline CJ49er

Re: Mike's Cad Bane
« Reply #60 on: January 14, 2018, 07:41:12 PM »
it looked great! Nice work Mike.
  • Like
SL/TI/TK/DS/BH 12770

Offline CadBane3

Re: Mike's Cad Bane
« Reply #61 on: January 29, 2018, 03:55:00 PM »
Feedback received from the BHG detachment leader! Mostly good news and some very, very bad news.

Good news is that the following items are mostly fine:

Hat, black undershirt, inner jacket, holsters, satchel, and boots (yes!!!! These passed! I was worried about them).

The bad news is that everything else needs work. Luckily, most of the items are purely cosmetic:

Mask: Two small disks on either side of cheeks need to be dry brushed silver. Need to dry brush face with black to make the scars stand out. Easy enough.

Fingers: Need shading to match mask with a blackwash. Easy enough.

Gloves: Need to redo the strap on the bottom so that it goes all the way around and the rounded ends but up against the top hand plate. Needs brown snap heads. Not a problem as I was going to remake them anyway with a larger size to start so that the fingers can insert into them a little easier.

Duster Coat: Weathering needs work (knew this was coming). Sleeves do not come to a point. Outside edges of sleeves are longer than inside, but are rounded. Front of coat needs to close more, showing less of the inside coat (going to be really difficult).  This may also help with pointed flaps laying flat. Top pointed flap is correct width. Middle flap should extend as wide as wearers’ chest. Bottom flap is approximately half the width as middle flap. Collar around back needs to sit flush and breather canister top should start on collar, with the bottom piece just below collar. All these will be tough to do.

Pants and Chaps: Need to tone down the red and add more brown. Need to be less baggy. Dang. They're already pretty tight...

Jet Boosters: Not tall enough.  Should extend approx. 1.5”-2” above top of boot. Knew this one was coming.

Pistols: Scope bracket should be dark grey/black. Easy enough.

These items may need to be totally remade:

Breathing Apparatus: Too much black from last ring to canister on each side, Canister sits too low on back. Should be at collar. Shape is a bit crude, and the ends need to be more rounded. Might be able to get away with adding some worbla around the ends and rounding it out better. Not sure on that. I have raised it up on my back further with Velcro on my coat, but maybe I need to raise it up even higher.

Gauntlets: May need to be totally redone and these were a complete nightmare in the first place. Here is the specific feedback...
-    Not properly sized to wearer… too short.  Back end of gauntlet should end where second ridged section ends moving in from corded end.  This will extend the upper deck for more correct spacing between top pad and back end of upper deck.
-    Back angled box needs properly spaced on top.
-    Side discs should be drybrushed black with smaller disc a bit lighter.
-    Electroshock emitters on sides should be silver metallic/brass/black drybrushing.
-    On front top panel, discs are reversed.  Two small stacked circles should be on outside for both.  Right is correct, but Left is wrong.
-    Underside elbow end is totally wrong shape, and does not flow properly from inner “egg-shaped” hydraulic.
-    Dart on underside should not extend beyond end of Gauntlet, prior to cuff section.  Tube behind dart should be shorter.  Dart base shape not correct.

So, at least I know what I need to do and can take care of most of the stuff pretty easily. Some of the jacket issues are going to be tough and the gauntlets have already been an absolute horror show. Not sure if I can salvage any of the parts I currently have or if I need to 3d print all the pieces again. Not gonna say I'm demoralized as I thought the gauntlets were pretty damn good, but I'm certainly going to step away from it for a day or so and then look at it with a fresh attitude... I dunno... whatevs...
  • Like
Mike
TK/TB/BH/DS/DZ-42125

Offline Bodacieah

Re: Mike's Cad Bane
« Reply #62 on: January 29, 2018, 06:35:19 PM »
I think it looks great and with the changes it will look AMAZING!


Sent from my iPhone using Tapatalk
« Last Edit: May 23, 2018, 08:22:16 PM by CadBane3 »
  • Like

Offline CadBane3

Re: Mike's Cad Bane
« Reply #63 on: February 01, 2018, 03:33:21 PM »
When we last left our intrepid builder, he had received feedback and was pouring over it, looking for what to do. The adventure continues...

So, having read through the feedback for a few days, I started puttering around on the "low hanging fruit." To me, this means the items that just need a little paint or some minor alterations. I started out with the blasters. The scope bracket is to be darker. Here is the before:

20180113_092807 by Michael Halstead, on Flickr

And now the after:

20180130_143408 by Michael Halstead, on Flickr

Then, I was sitting at my desk, thinking about the breathing apparatus. I had searched Parkrose several times for rounded items that I could use for the ends of the tank. Then, with the luck of having just painted and setting the breathing apparatus on top of my palette, inspiration hit! These were the exact shape and size that I needed!

20180130_144037 by Michael Halstead, on Flickr

So, after cutting up my palette (RIP), I had exactly what I needed. Add a little worbla, and viola!!!

20180130_144418 by Michael Halstead, on Flickr

Also, the feedback said there was too large of a gap of black hose between the last ring and the breathing apparatus, where it connects to the hoses. I added a bit more worbla to correct that issue as well:

20180130_153543 by Michael Halstead, on Flickr

Was able to add some paint today and here is what I have now:

20180201_141548 by Michael Halstead, on Flickr

Since I had my paint out, I looked over the list and found what else needed some revisions. The mask had a few areas. More definition to the scarring and the silver disks on the face area. I added the appropriate paint and came up with this:

20180201_141607 by Michael Halstead, on Flickr

The scars are a darker black now and the silver disks are there.

Lastly for now, my fingers needed some shading to match the mask. I mixed up some watery black and added it to the knuckle areas. They look much better now:

Before:

20180113_093456 by Michael Halstead, on Flickr

Now:

20180201_143524 by Michael Halstead, on Flickr

Last portion of today's update was that the jet boosters needed to be taller. I thought this would mean that I needed to remake them entirely. Since I had my heat gun out, I was able to hit the worbla on top and get it melty enough that the e6000 that was holding the tops on gave up so I was able to get the cap out. Now I just need to buy some more PVC pipe, add it to the hole, worbla around it, paint it, and they are done. Should be able to do that by my next update.

20180130_135202 by Michael Halstead, on Flickr

I'm holding off on the gloves as my Chris Stevens Creations mask and hands are being shipped and I'd like to see those before I commit to cutting up a new pair and remaking the gloves. I have 2 spare pairs laying around here, so I just don't want to have to buy more. I also have a spare set of hands on order from Woodman, and they are looking good in the clay sculpting stage. Should have those in the next month or so. Looking for all the options to make this costume awesome.

After I work on the jet boosters, I may work on the pants/chaps. That one seems easy to get done. It's just some paint and stuff. It's the duster coat and the gauntlets that I am holding off to the end. I re-reviewed the gauntlet feedback yesterday and think I can do it and then fortune would have it that I stumbled upon a stack of spare ABS that I had ordered when I was doing a new belt and shims for my TK:

20180201_152504 by Michael Halstead, on Flickr

I'm going to try to heat form it to what I need. Unsure if it will work at this point, but it's about all I can think of doing. I also need to cut up what I have and move stuff around, which I am not looking forward to doing (sad tears  :cry:).

The journey continues!
  • Like
Mike
TK/TB/BH/DS/DZ-42125

Offline TrooperTim1138

  • Posts: 38
    • Awards
    • Awards
    • Awards
  • Real Name: Tim Hadley
Re: Mike's Cad Bane
« Reply #64 on: February 02, 2018, 08:42:25 AM »
Keep it up man! This project is looking fantastic!
  • Like
Tim Hadley- Future Clone (ARC Trooper Echo)

Offline CadBane3

Re: Mike's Cad Bane
« Reply #65 on: February 02, 2018, 05:43:01 PM »
Not much time to work today, darn job kept getting in the way, but I have a few slight updates.

First thing was that my jet boosters were too short and they need to be around 2 inches above the top of the boot. Ran to the hardware store and couldn't get out with less than 10 feet of PVC pipe, which is hilarious because I only needed about 4 inches. Was able to cut it to size and started with this:

20180202_084839 by Michael Halstead, on Flickr

Add some E6000 just to keep them in place for when I Worbla them, and to make sure that they are the right height:

20180202_084935 by Michael Halstead, on Flickr

Then, I butchered up my old kick plates that were too small and cut the worbla to size:

20180202_150653 by Michael Halstead, on Flickr

Hit them with the heat gun to get the worlba to shape and try to smooth out any transition points, as I didn't want to redo all of the worlba, that stuff's expensive! I ended up with roughly this:

20180202_152414 by Michael Halstead, on Flickr

Then I added some wood glue to smooth out the transition:

20180202_153555 by Michael Halstead, on Flickr

Leaving them like that to dry and then will repaint them and they should be good to go.

Next, the pant/chaps were too long so that they bunched up and I needed to tone down the red and add some brown. Time to go back to my roots and work with pleather again!!! I know you all have been waiting for this moment, so here we go!!!

Here they were before:

20180113_092638 by Michael Halstead, on Flickr

I first did the coloring and came up with this:

20180202_160031 by Michael Halstead, on Flickr

Then, I cut off about 3 inches, enough that they will still tuck into my boots and give me enough to make a hem:

20180202_160636 by Michael Halstead, on Flickr

Sewed that back up and ended up with this length, much better:

20180202_162032 by Michael Halstead, on Flickr

Here they are in all their pleathery glory!

20180202_162151 by Michael Halstead, on Flickr

Lastly, I decided to go ahead and start working on the gloves even without my new hands/fingers because the hands I have can still work. I have a XXL pair of gloves that I think will work better for the finger insertion point, so I started cutting them up:

20180202_163351 by Michael Halstead, on Flickr

You can see the old gloves on the left. The feedback on the gloves was that there is a strap at the bottom that goes all around the glove and attaches with a snap and the half disc on top floats on the glove, attached to the side straps. So, I started adding the studs:

20180202_165402 by Michael Halstead, on Flickr

Then I cut out the replacement leather and the parts that will be the strap:

20180202_171939 by Michael Halstead, on Flickr

I have a few questions that I am working on as the reference pictures only show a snap at the bottom of the wrist, so I am inquiring if one is needed on the top of the wrist as well. We don't really see it, but perhaps there is reference material out there that does show it, so I asked the DL for input as I want to make them one more time and not have to tear them apart! It would make logical sense to have one on the top as well.

I'm real hopeful for some work time tomorrow so I can start taking apart the gauntlets and getting them worked on. That would just leave the jacket and I can resubmit. Hopeful that I can keep up the momentum.
  • Like
Mike
TK/TB/BH/DS/DZ-42125

Offline Bodacieah

Re: Mike's Cad Bane
« Reply #66 on: February 02, 2018, 07:56:57 PM »
You buying the whole pig I bought the whole cow for my Mara Jade vest!  Keep up the good work!


Sent from my iPhone using Tapatalk
  • Like

Offline CadBane3

Re: Mike's Cad Bane
« Reply #67 on: February 02, 2018, 09:37:09 PM »
You buying the whole pig I bought the whole cow for my Mara Jade vest!  Keep up the good work!


Sent from my iPhone using Tapatalk

Thanks! And I'm glad I did as I only have a few small scraps left. I've ended up putting almost all of it to use!
  • Like
Mike
TK/TB/BH/DS/DZ-42125

Offline CadBane3

Re: Mike's Cad Bane
« Reply #68 on: February 03, 2018, 08:12:41 PM »
Again, not much time today, but was able to accomplish a few things and maybe scratch a few more items off the to-do list.

First, I was able to paint the jet boosters, so they should be done now:

20180203_112200 by Michael Halstead, on Flickr

Then, I was struck with some serious inspiration. His gloves have a snap on the bottom that holds the bottom strap in place. I cut out the leather and added a little tab on the bottom of both half circles so that the half circle could be free-floating, as it appears to do in the show:

20180203_104058 by Michael Halstead, on Flickr

20180203_104059 by Michael Halstead, on Flickr

See, this allows the free floating piece, that will calm down and lay flat after the leather gets a bit of use:

20180203_104104 by Michael Halstead, on Flickr

Then, I added the bottom strap with snaps:

20180203_104811 by Michael Halstead, on Flickr

20180203_104814 by Michael Halstead, on Flickr

Glued all the rest of the leather decorative parts on:

20180203_111511 by Michael Halstead, on Flickr

And ended up with these:

20180203_174151 by Michael Halstead, on Flickr

Hit them with some paint, as well as some on the studs to dull their shine:

20180203_181205 by Michael Halstead, on Flickr

20180203_181658 by Michael Halstead, on Flickr

And I think I have two more pieces to resubmit. This leaves just the duster and the gauntlets, which I am hoping to work on really soon.
  • Like
Mike
TK/TB/BH/DS/DZ-42125

Offline Bodacieah

Re: Mike's Cad Bane
« Reply #69 on: February 04, 2018, 10:25:52 AM »
Love them!


Sent from my iPhone using Tapatalk
  • Like

Offline CadBane3

Re: Mike's Cad Bane
« Reply #70 on: February 04, 2018, 01:19:34 PM »
Put a little work in the last remaining parts today. Gauntlets and jacket. Didn't finish either but glue is drying and I don't want to rush them. A bit sad that I had to cut up and alter my gauntlets, but in looking at them, they do need to be more accurate, and if I can work with them, I can make them even better.

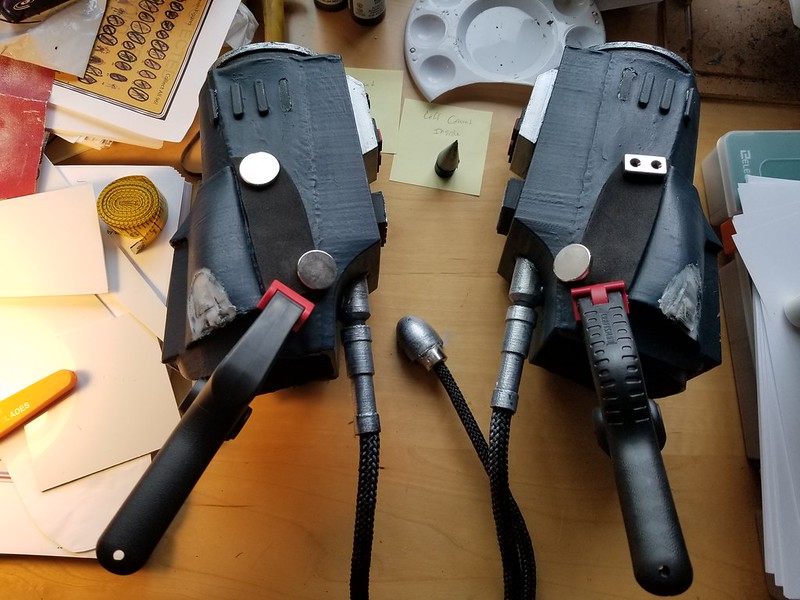
Started out saying goodbye to them with a pic of their current form:
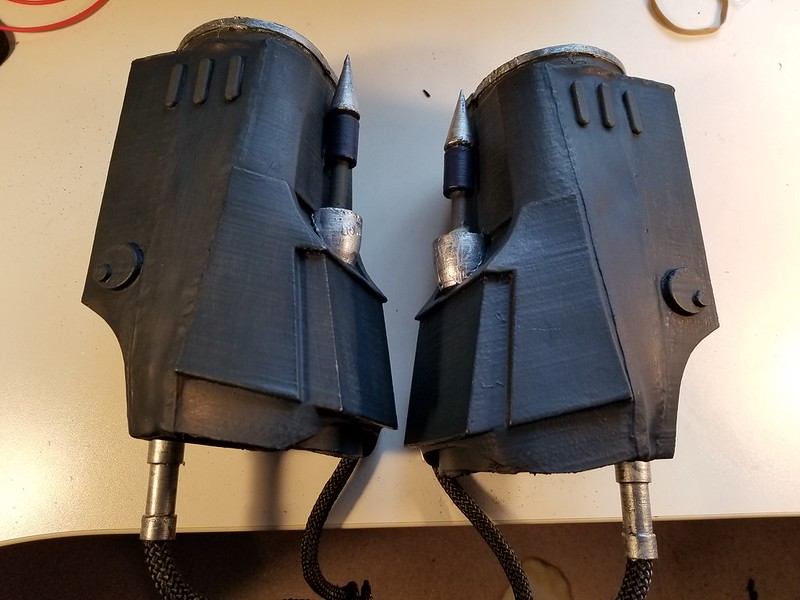
20180204_102615 by Michael Halstead, on Flickr

Then, I started cutting them up. The tool I used most in this build is certainly the Dremel, so I started with cutting off the lower hose assembly as that needs to move up about an inch.

20180204_105552 by Michael Halstead, on Flickr

20180204_105732 by Michael Halstead, on Flickr

Then I cut off the darts, as they both need work as well:

20180204_111402 by Michael Halstead, on Flickr

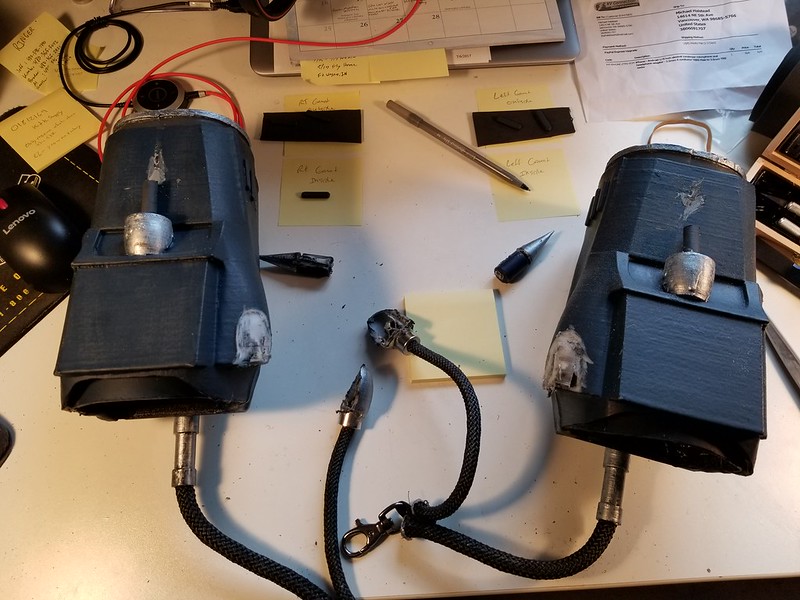
I also had to remove two of the electroshock emitters, as two of them need to be moved. This is where I got confused and removed the wrong one first, on each gauntlet. Said some choice words, and then removed the correct one! Whoops!

I then had to shave off the "buttons" on one of the gauntlets as they were reversed and need to be switched around. Will have to build new buttons out of worbla and remount them and fill the holes.

20180204_112034 by Michael Halstead, on Flickr

The wrap around detail on the bottom of the gauntlets need to come up further. This error in my initial build occurred when I couldn't get the original gauntlets to fit and had to mount them to the PVC pipe. This stretched the gauntlets vertically, but I didn't stretch any of the details. For this, my first effort to repair is to cut some craft foam to the right size and attach it with E6000 and then I'm going to see if I can use gesso to fill in the gap between the original gauntlet and the foam piece. The gesso will also allow the foam to take paint better (wood glue would also probably work for this).

20180204_113308 by Michael Halstead, on Flickr

Once that side dried (which is much quicker with foam than it dries when you are just gluing ABS), I did the other side. This side has a slope to it, and is the inside portion of the gauntlet. You can see the electroshock emitter has been moved in this picture (the three lines near the cuff).

20180204_123715 by Michael Halstead, on Flickr

That may be as far as I am going to get before the big sports game! As a list for myself, I still need to:

1. Build up the lower, forearm end.
2. Shave down the darts and remount them.
3. Correct the main hose insertion point at the back of the gauntlet.
4. Reattach the secondary hoses about an inch higher than they were.
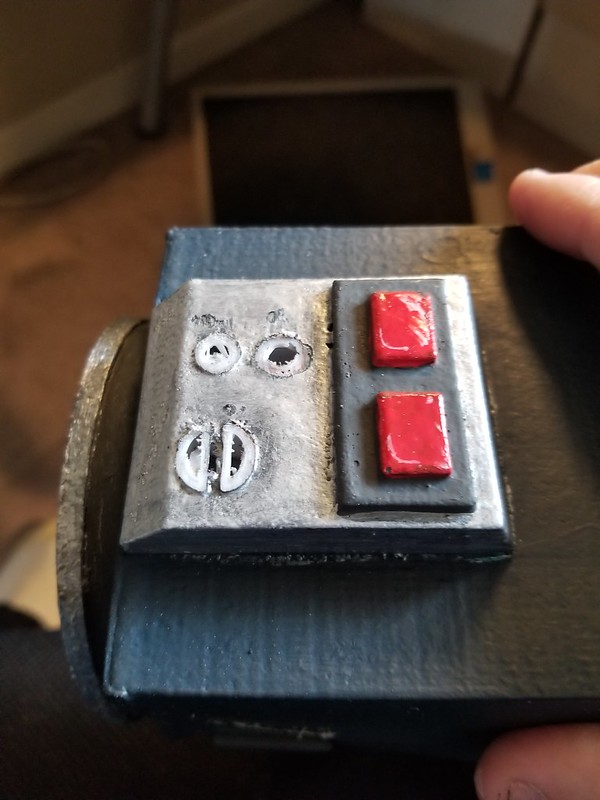
5. Build the buttons for the top of the one gauntlet.
6. Fill in the holes created by removing the secondary hoses.
7. See if I can use gesso to smooth out the transitions between materials and to make the gaps between the original gauntlets and the foam disappear.
8. Perhaps hit them with plasti-dip again so that they are all one material on the surface.
9. Repaint the main gauntlets the color they were.
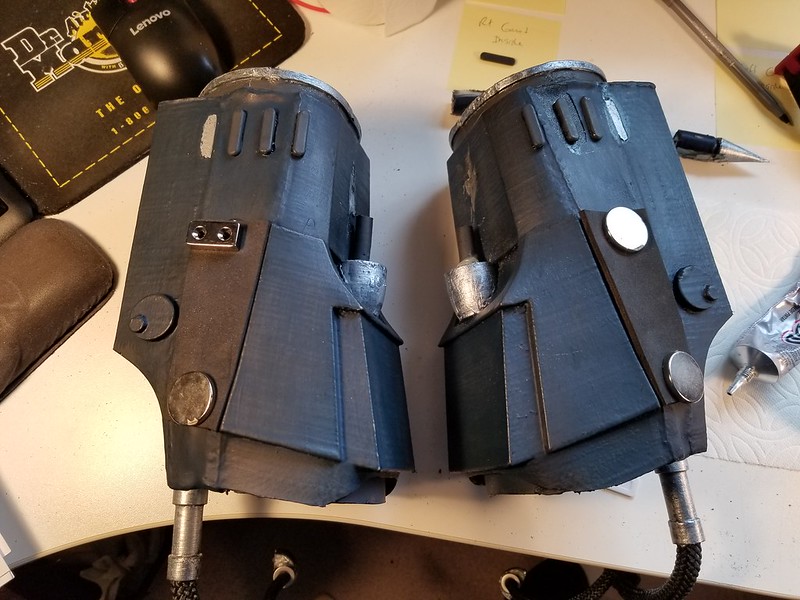
10. Paint the side discs a drybrush of black with the smaller disk slightly lighter.
11. Paint the electroshock emitters silver metallic/brass/black drybrushing.
12. Paint the circles that I have to build and anything else that gets messed up in the plasti-dip process.

So, not really all that much once stuff dries... Really hopeful that I can get them to work and not have to start over.

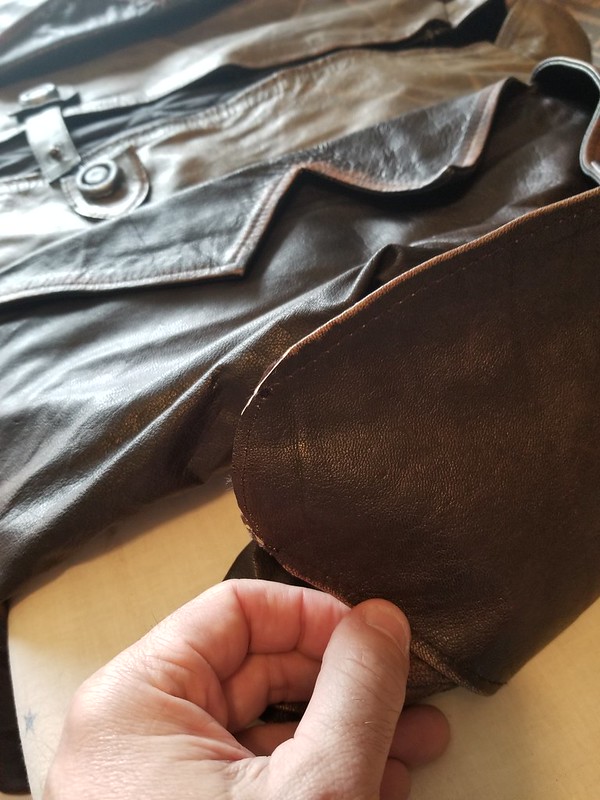
I also spent a little time while glue was drying to work on my duster. The sleeves were pointed and they need to be rounded, so I cut them off and sewed them back shut:

20180204_121106 by Michael Halstead, on Flickr

20180204_121116 by Michael Halstead, on Flickr

The slight discoloration on the end will not matter as I have to weather the whole jacket, so I can just paint the leather at the ends a darker color to hide that the leather has been cut.

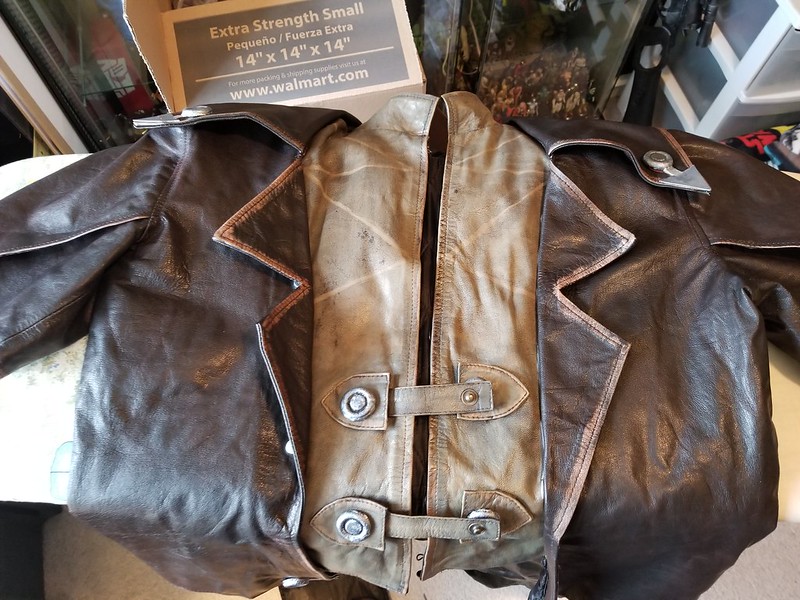
The front of the coat needed to close more. The flaps were pretty floppy, so they would move around and they are open too far, so I went the easy route and just slathered them with leather glue and I am going to just force them into place. If the leather glue keeps them where they are supposed to be, it's one less possible part that can wardrobe malfunction.

20180204_121639 by Michael Halstead, on Flickr

This has the added effect of making the triangle flaps at the front the right size. I may need to cut the bottom one a bit, but am going to wait and see if this corrects them enough.

The last thing the duster needs is better weathering. I'm going to let this dry and then see what I can do to match the reference material with my weathering.

So, that's about the list of remaining items I need to finish in order to resubmit. Seeing a light at the end of the tunnel. Anybody reading this anymore? LOL

I also started working on the voice. That was one of the main reasons I wanted to do this character, so I am going to have to sound like him. No question. I bought a condenser microphone and an adapter for an iPhone and I am going to see about getting the app VoiceSynth. I have heard that you can get a pretty good Cad Bane voice through that app, but if anybody has any experience with it, please let me know. I'm not sure what I need the settings to be, so it's going to be a lot of trial and error. Should be fun though.
  • Like
Mike
TK/TB/BH/DS/DZ-42125

Offline daryldoak

Re: Mike's Cad Bane
« Reply #71 on: February 04, 2018, 03:46:38 PM »
I really love reading your WIP, so detailed.  You’re setting the bar really high!  Great job.
« Last Edit: February 05, 2018, 08:49:35 AM by daryldoak »
  • Like
TK/TA/TS/IS/IC/BH-11371

Offline TrooperTim1138

  • Posts: 38
    • Awards
    • Awards
    • Awards
  • Real Name: Tim Hadley
Re: Mike's Cad Bane
« Reply #72 on: February 05, 2018, 08:14:07 AM »
Seriously great work. You have put so much time and effort into this project, the end result will be worth it! I literally check this WIP every day!
  • Like
Tim Hadley- Future Clone (ARC Trooper Echo)

Offline CadBane3

Re: Mike's Cad Bane
« Reply #73 on: February 05, 2018, 09:14:14 AM »
Seriously great work. You have put so much time and effort into this project, the end result will be worth it! I literally check this WIP every day!

I really love reading your WIP, so detailed.  You’re setting the bar really high!  Great job.

Thanks gang! That's why I do it! Hoping to get some time to epoxy a bit today. Anybody have suggestions for what to use as a filler for the areas where I need it (closing holes in the plastic)? Was thinking I could just use epoxy or perhaps spackel. I don't know which would be better. Probably the epoxy, as it would be more permanent, but it's a bit tough to form... I can sand it down once it's in though...
  • Like
Mike
TK/TB/BH/DS/DZ-42125

Offline CadBane3

Re: Mike's Cad Bane
« Reply #74 on: February 05, 2018, 02:54:34 PM »
Alright friendly followers, time for your daily dose of Cad Bane! So, I went on the offensive today with the epoxy and decided that I would use it as a filler as well as an adhesive. Will it work? I dunno. Seems to so far.

To start, I started building up the back of the gauntlets (forearm area) with some craft foam as it needs to be slightly raised from the rest of the gauntlet. This was just E6000'd into place so that it can be removed and replaced if it is wrong:

20180205_083548 by Michael Halstead, on Flickr

Then, I put on the breathing mask, opened all the windows, and went to town! I have been using this stuff:

20180205_095931 by Michael Halstead, on Flickr

Cures quick but gives you time to work with it. Smells like it's damaging my entire respiratory system at once, so you know it's quality!

First thing was to re-secure my now shortened wrist darts:

20180205_095940 by Michael Halstead, on Flickr

20180205_100425 by Michael Halstead, on Flickr

Then, the tough part of re-securing the hose connectors. At this point, I also used a large amount of the epoxy to help fill in the area where the hose connector had been removed from. The plan was to get it on there real thick and then sand it down later:

20180205_100318 by Michael Halstead, on Flickr

As you can see in this picture, adding the craft foam to extend the raised section, also left me with a significant gap:

20180205_100322 by Michael Halstead, on Flickr

So, I epoxied that as well!

20180205_101955 by Michael Halstead, on Flickr

Repeat for the opposite side:

20180205_125722 by Michael Halstead, on Flickr

Now, while the epoxy was drying, I needed to figure out how to remake the button "greeblies" so I turned to my staple for this build of worbla:

20180205_102127 by Michael Halstead, on Flickr

One of the great things about worbla is that you can save all your scraps, reheat them and reform them. So, I started with a pile of scraps:

20180205_130245 by Michael Halstead, on Flickr

Heated it into a ball:

20180205_130435 by Michael Halstead, on Flickr

Flattened it out:

20180205_130649 by Michael Halstead, on Flickr

And then cut out the parts I need. The worbla looks surprised about how useful it is!!!

20180205_131126 by Michael Halstead, on Flickr

Then, I formed these to what I needed and glued them on. Viola!

20180205_132951 by Michael Halstead, on Flickr

Then, I sanded down the now dried epoxy and applied a generous first coat of Gesso. Trying to fill in the gaps. When Gesso dries, you are able to sand it down, so the hope is several layers of Gesso and then some sanding, and the gaps will be gone and I'll have smooth gauntlets.

20180205_135723 by Michael Halstead, on Flickr

Lastly for the day. The feedback on my duster was that the weathering needs work. The jacket came and looked like this:

20180113_092933 by Michael Halstead, on Flickr

20180105_155950 by Michael Halstead, on Flickr

I was never really happy with how it looked. The weathered spots looked to be a bit too light, so I darkened them up a bit:

20180205_142343 by Michael Halstead, on Flickr

Hard to tell in the picture. Will that be what they are looking for? I don't know. I'd rather do a little at first and then request more specifics. So, now the to-do list is down to just finishing finish the gauntlet changes. I will apply a few more layers of Gesso, or maybe switch to wood glue, sand them down, repaint them, and I think I am ready to resubmit for a second round of feedback.

Thanks for all your support and reading this! If anybody has any inspiration about the duster weathering, please pipe up, I could use some input! Thanks!
  • Like
Mike
TK/TB/BH/DS/DZ-42125

Tags: